Wednesday, June 27, 2012

Shimmer Polish Pt. II: Vanessa

I have the second of my two Shimmer Polishes to show off today: Vanessa!


 It is described in the shop as "Dark grey silver pewter with a hint of red." Which is pretty spot on, but doesn't quite do it justice! The main glitter in this polish is a gunmetal grey with lots of silver. There is red, as well as a slightly larger black glitter, and some holo thrown in for good measure. Right up my alley- I *adore* grey polishes :) This polish will be opaque in three coats, and just like Airriann, is packed with small glitters.


I started off layering this over Sinful Colors San Francisco as a glitter gradiant, but I really wasn't feeling it. I didn't even do both hands. But in the interest of full disclosure, I thought I'd share it anyway. I don't know what possessed me to try this on green. I doesn't look horrible, but there isn't any green glitter to pick up the polish . . . but I really love this green. Proof that just because you really love two things, doesn't mean those two things are good together!


Second attempt: I started with two coats of L.A. Colors BCC, a dark, pewtery silver. 


Two coats of Vaness over the BCC. One coat of Seche Vite. Photo taken in natural light. 


And inside, with flash.

Seche Vite did not play nice with this polish. I had some pretty bad shrinkage. But I'm really not an SV fan. Out the Door and Sally Hansen Hard As Wraps topcoats both looked lovely, with no shrinkage. 

Vanessa is named after the creators friend and her love for Tim Burton's Nightmare Before Christmas. It can be purchased in her Etsy shop for $12. She can also be found on Facebook and her own Blog.


Saturday, June 23, 2012

Shimmer Polish Part I

I have a brand new indie polish to show off today: Shimmer Polish, who just opened shop on Etsy at the end of May. Shimmer Polish is an amazing line of clear based glitter polishes, all named after women who were influential in her life! The polishes consist of small and micro glitters, which I love, as it give it more of a cohesive look. It makes it feel more like a polish, rather than a glitter topcoat. Most of the colors are opaque in three coats. Full size polishes are $12.

After browsing the store for about an hour, narrowing down my choices, I settled on Airriann and Vanessa. I'm going to cover Airriann today, and then I'll come back to Vanessa in another few days.

Airriann is described as "Pale Pink Melange Glitter Polish!"


This polish has apparently been incredible divisive in the nail community in the short amount of time it's been around. It's either love it or hate it. I, personally, fall on the love it side! I'd call it a "neutral" glitter, if I could convince myself there was such a thing :) Staring at my bottle, trying to pick out all the individual colors, here is what I've come up with: The main glitter is a pale pink, with lots of gold as well. Then there are sprinkles of red, black, gold holo and maybe some blue? That may just be the holo playing tricks on my eyes. Either way, this polish is fabulous, and I wore it just about all week. Two separate manicures in a row, actually.


Here is the first mani: Two coats of Airriann over two coats of my most beloved nude, NYC Carried Away (which can be seen in my rehab post), topped off with a coat of Out the Door. This one did not get completely opaque in three coats, so I wanted a nude base underneath it. I absolutely loved this. It was very subdued without being boring. If you're a glitter lover, but you need something not too blingy (for work, or whatnot), this would be great. 


Another shot, just because. It looks very predominantly brown over the nude. The color seems to change over every base color I tried it over.


I used an entire nail wheel swatching these two polishes. I had to limit myself to 8 base colors to try per color. Here is three coats of Airriann on its own, and one coat over Sinful Colors Midnight Blue, then Sinful Colors This Is It. Both of these undies seem to pick up brown tones- though I swear I don't see any brown glitter in the bottle. 


Here we have one coat over Wet N Wild Red Red, Sinful Colors Happy Ending, and NYC Midtown Mink. You can see the pink glitters a lot better over the green and brown.


Finally: one coat over Wet N Wild Tickled Pink, Sinful Colors Forget Now and Wet N Wild 9021Orange. The sparse black glitter really popped on the last two. 


I couldn't pick a color, so I did a gradiant. I started with a base coat of Wet N Wild 9021Orange, then sponged on Wet N Wild The Wonder Yellows at the cuticle, Sinful Colors Forget Now in the middle, then Rimmel Night Before at the tips.


I added a thick coat of Airriann on top of my gradient. The black glitter really popped against the bright colors, while the lighter pink and gold glitter really caught the light. Photo is topped off with one coat of Seche Vite. I love this look; it will probably be a go-to mani for when I run out of ideas. 

Shimmer Polish can be found on Etsy, Facebook, and her own blog, Shimmer Polish.  Have you tried Shimmer yet? Which colors did you go for?


Sunday, June 17, 2012

New Not Too Polished Colors!

Just wanted to put up a quickie today, to show you a few of the new colors I've been working on. I've got three collections that will debut by the end of the month.

The first collection is called the Hogwarts Alums, and is (obviously!) Harry Potter inspired :) These are my faves so far:

Lestrange: a black jelly with black, silver and silver holo micro glitters. For Bellatrix Lestrange, Death Eater and psychopath extraordinaire.

Granger: sheer red jelly with multi sized gold and gold holo glitters. Hermione Granger truly is the cleverest witch of her age.


The second collection is called The Great Houses of Westeros, and is the first of 2 (yes 2!) Song of Ice and Fire Collections. Highlights:

Dragonstone: another black jelly, this time filled with black and red micro glitter, plus medium sized red squares. Dragonstone is the ancestral seat of power for the displaced Targaryen family. A red, three headed dragon graces the black banners of their house. "Fire and Blood."

Winterfell: a pearly dove grey base with multi sized white, silver, silver holo and aqua glitters. Winterfell is the seat of House Stark, Wardens of, and formerly Kings in the North. The sigil of House Stark is a grey direwolf on an ice white field. I wore this for 4 days when I tested it- unheard of! "Winter Is Coming."


Your final sneak peek is from the 3rd overall, and 2nd ASOIAF collection, The Magic of Westeros.


This stunner is The House of Black and White: a clear base with multi sized black and white matte, plus silver holo glitters. The House of Black and White is a temple to the Many Faced God on the isles of Braavos, and is home to the Faceless Men. Technically, this makes this the magic of Essos, and not Westeros, but a girl will not fault me for a technicality, yes? Just so. I am currently putting this on over a silver, and I'll show it off in a few days. This may even last longer than Winterfell did: I absolutely love it! Not your typical black and white topcoat :)

So what are your thoughts so far? Have I portrayed your favorite characters properly? Please know that they're my favorites too: this is how I perceive them through nail polish.

Check out my Facebook page for more sneak peeks and release date information:
Or check out my Etsy store to see what is currently in stock:


Wednesday, June 13, 2012

F4 Polish Flubber

Just a quickie today- I want to show you another of the F4's that I bought- Flubber! Described by F4: "FLUBBER is a jelly based green lacquer with with fine holographic green glitter, small Green hex glitter and large green hex glitter."


Straight to the point- this is 3 coats of Flubber over bare nail (though it should be noted that this was before the acrylics came off. You can see a bit of the french tips peeking through). I loved the fact that the base was tinted, rather than just clear and packed with glitter. It gave it just a bit of something extra, without going whole hog into a colored polish. I will say that I thought the base was more yellowy than green.

The glitter went on very well (as well as large glitters can!). I didn't have to fish for the large bits too much- in fact I somehow ended up with four of them on the ring finger of my right hand! Which is awesome, because I hate fishing.


Here is just another angle shot. You can see a bit of tip wear, but to be fair: I wore this for four days, without topcoat. Please don't hate me, I was being lazy. If I wear it again (I only say if because three coats on ten fingers took up a good chunk of my mini bottle), topcoat is a must. Because I tend to pick at my nails, and I lost several of the larger glitters that just wouldn't lay flat. Again- my fault for leaving them topless. 


And an awesome closeup! See the true majesty of the loveley holo glitters, while please ignoring the chunks that got picked off :) 

My only real complaint with this polish was in removal. I had to foil. For the first time ever. I'm usually patient enough to work the glitters off with a cottonball, but those big suckers did. not. want. to. move. I had to attack each one separately and pick it off. I don't have a lot of experience with huge glitters like these, so maybe it comes with the territory. 

Overall, I loved this. It was very eyecatching, and the girl working at the counter when I went to Sally's actually asked me where I got my "manicure" done, because the glitter was so cool! F4 has some amazing colors, available in their Etsy shop . Full size bottles are $8.


Monday, June 11, 2012

Officially In Rehab

So I'm already kind of breaking my own rules, as none of the products in this post are handmade. However, I am starting a huge effort with my nails, and did not find any indie products that met my needs. A little background:

My name is Liz, and I'm a recovering addict. I have worn acrylics for the past 6 years, without any break whatsoever. My nails were weak and soft and prone to peeling to begin with, so I thought that wearing acrylics would allow me to use my nails a bit more. But now I've had enough. I'm tired of the upkeep and the expense. Also, now that I'm painting them far more often, they don't last nearly as long. Nail polish remover, even the acetone free kind, eats acrylic. So last night I took them off. Pitched them and all of the upkeep supplies that I had. And went on a shopping spree for my rehab efforts. Here is my story (so far).


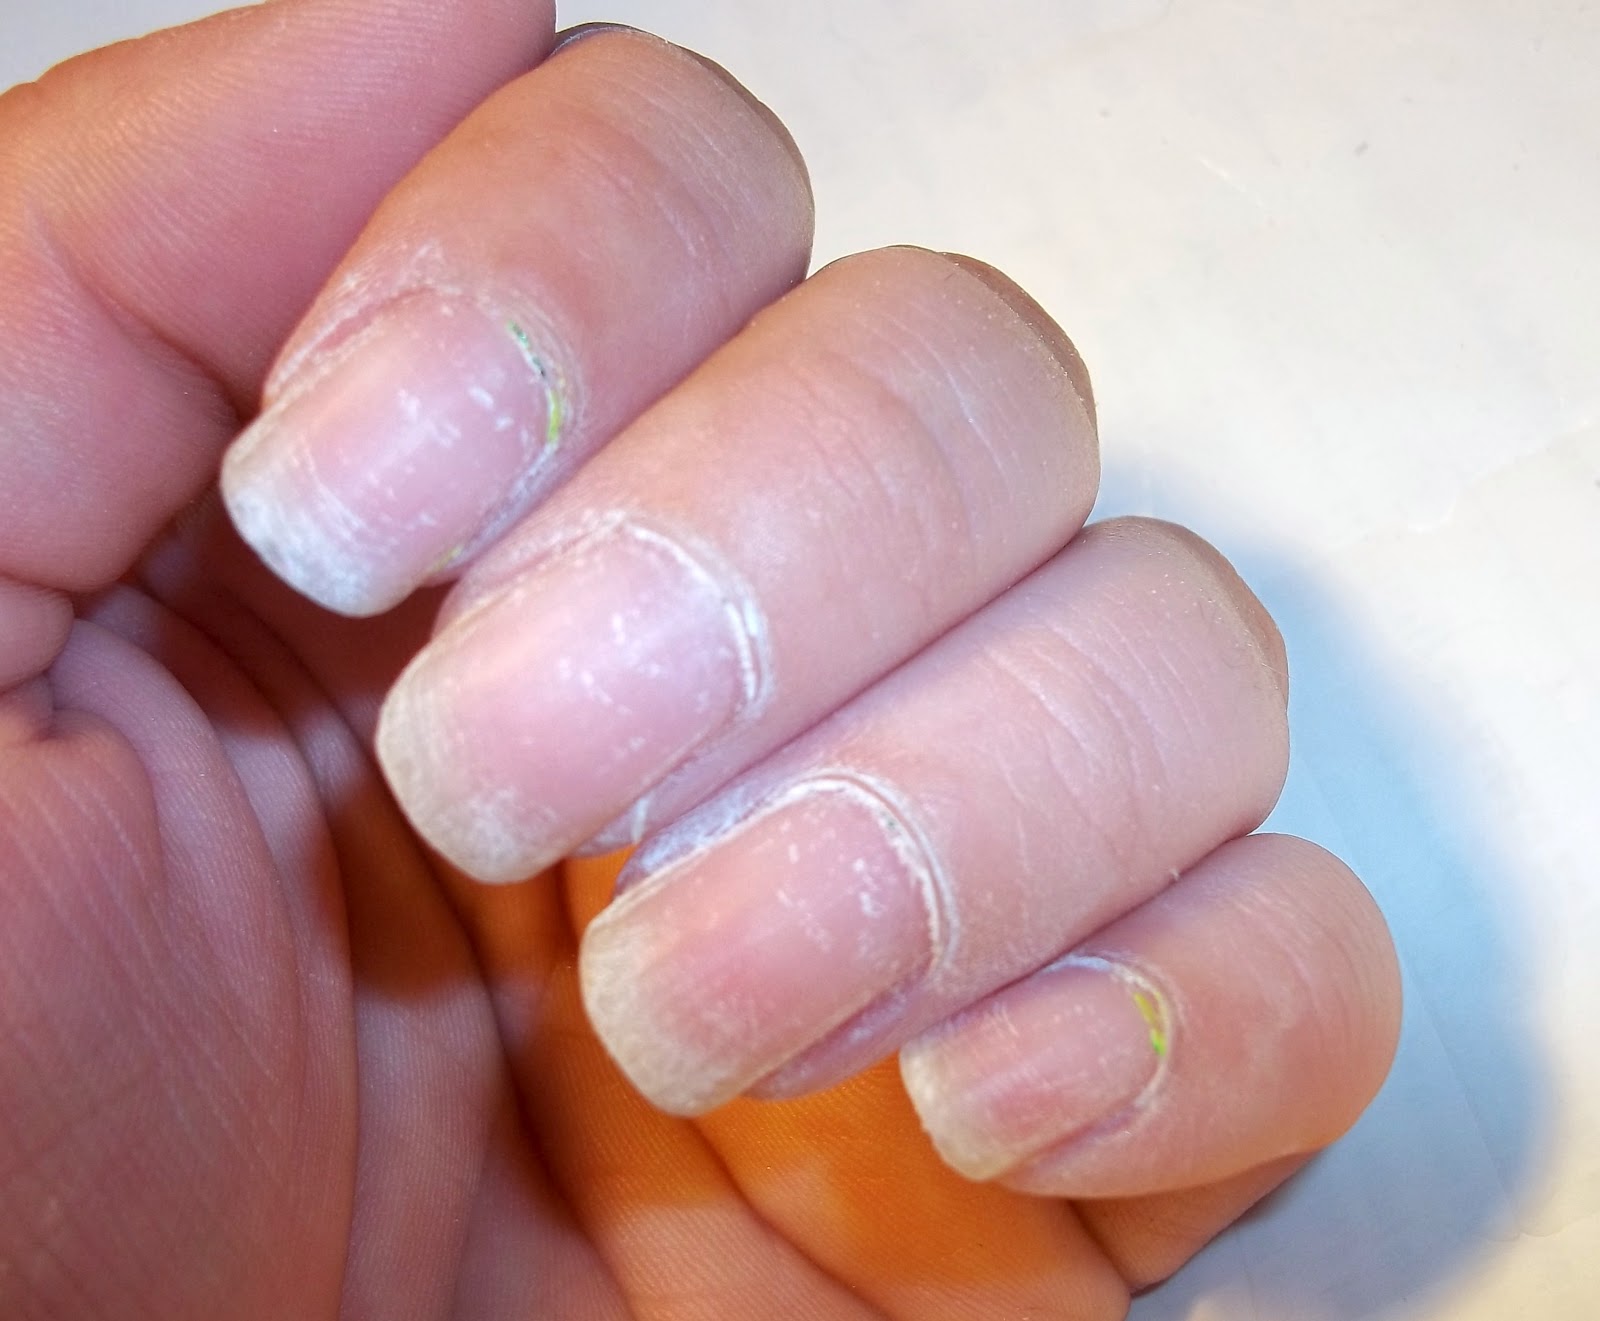
This is how horrible my nails looked right after the acrylics got taken off. See the huge flaky patch on my thumb? ::Shudder:: At least they have a little bit of length to them. It makes the adjustment process far easier. Let me be the first to tell you how odd it feels to be typing right now though. My nails are very thin from all the filing (needed to adhere the acrylics) and the buffing (to smooth out the filing). 


My nails have now been filed to smooth out the ends, and buffed with the roughest side of a buffing block to smooth out the tops. This step took approximately 15 minutes to do both hands. They still look atrocious.


Now we finally see a little bit of improvement. My cuticles have been pushed back, and the 2nd and 3rd sides of the buffing block have been used. That block is a miracle worker on it's own. My nails are glassy smooth, even though the still look pretty nasty. This took another 10 minutes or so, but even on my thin and ravaged nails, the buffer block was incredibly gentle. None of the scraping, nails on a chalkboard feeling that comes from a regular file scraping off the top layer of nail. I decided against using the final side of the buffing block, the shine side, as I planned on painting my nails anyway.


Essie Grow Stronger Fortifying Nail Treatment. Promises 30% stronger nails in 5 days, up to 20 % longer nails in 5 day, and stronger and more resilient nails as they grow out. I got this at Walgreen's for $8.


Here it is on the nail. Applies perfectly clear, but it does appear to have hidden some of those white rough patches pretty well. I used it as a base coat for my color. 


And here are the final two steps for the night: color and topcoat. I used 3 coats of NYC Carrie'd Away (maybe $3 at Walmart? I already had this one, so I'm guessing). This is absolutely the perfect "Your Nails But Better" nude color for my skin tone. I can't stop looking at my nails, not because they're flashy and pretty, but because they look amazingly healthy, and they really have no right to. Because they aren't. But they polish makes them look so. There is still a bit of VNL, so it looks fairly natural. 

Topcoat is one coat of Sally Hansen Hard as Wraps Acrylic Gel + Nylon Clear Topcoat ($6 at Walgreen's), which promises to make my nail hard like wraps in one step! It did not. I dried my nail color for 2 minutes, as instructed, and then applied both as a topcoat and to the underside of the tips of my nails. The tips are still very flexible, but then my nails are an extreme case at the moment. So I'll let it slide. It dried quickly and left a nice wet looking shine. I'll keep at it until my nails are strong enough on their own. I did add a coat of Seche Vite (I know- 6 coats of nail polish! But it's really not that thick- the color is very thin on its own.), but I really didn't need to. My nails were dry, and the Sally Hansen added enough shine on its own. It's just habit.

So there you have the story of my very first nail therapy session. Hopefully the two products I picked are good ones. I'll keep you posted, as I'm well aware of how long and arduous a process this is going to be. If you have gone through this as well, and have hints or product suggestions, please let me know! And if you're in the same boat as me, let me know that too- we can be support buddies :)


Wednesday, June 6, 2012

First Review Ever! F4 Polish Pink Penquin

After lemming every polish from every indie seller on the market, I finally broke down and made my first ever indie purchase. I went with F4 Polish, an Etsy shop run by 3 sisters. Full size bottles are $8, but I caught a listing for 3 minis for $9, so I got Pink Penquin, Flubber and Chunky Cow minis. They arrived in less than a week, not too shabby for having ordered over a holiday weekend. I spent about an hour an a half swatching on a nail wheel before I could decide which color to start with, but the winner was Pink Penquin, a clear base filled with small black and white matte glitters, plus a medium pink matte hex glitter.

First of all: these bottles are adorable! Hot pink glittery label and a little rhinestone in place of the 'O'. 

And you can already see how this one won. I love the pops of pink that make it just a bit different than all the black and white topcoats that are out there right now (not that I don't love and want every single one of them!)


Here it is on a nail wheel (to the far right). I covered the whole nail with one coat, then started a second coat about a third of the way down, and a third coat two thirds of the way down. The middle nail is the same technique applied to Chunky Cow (which I'll review later), and to the left is one coat of Pink Penquin over Sinful Colors Out of This World. 


I really thought I wanted a pink base coat on this one. Something different enough to make the pink glitter pop, but still close enough to compliment it. Shown on nail wheel is one coat over 2 coats each of creme white, creme black, Wet N Wild Tickled Pink, Wet N Wild Dreamy Poppy and Sinful Colors Cream Pink (I know, I wear cheap underwear :) ). 


As you can see, pink just doesn't quite pop enough for this. So, on a whim and completely without swatching it first, I wore it over 2 coats of NYC High Line Gree. And it was AMAZING. Looks like a watermelon mani, without all the extra work! This has 2 coats of Seche Vite on top. 


This went on very smoothly, without the scary quick dry effect that a lot of mattes tend to have. The glitter applied pretty evenly, though a few nails are a bit thinner on coverage than most. I blame my impatience for that. The bottles sound like they have little mixing balls in them to keep things blended, but this didn't need any shaking at all. Just out of the package and get painting. I did use 2 coats of topcoat, but I don't think it was necessary. I do it out of habit. It didn't dry perfectly glassy smooth, but it wasn't rough and gritty either. 

After 2 days of watermelony goodness, I decided to add a matte topcoat. Since it was a matte glitter and all.   I liked it, but I much preferred the juicy, shiny finish. 


I'm pretty pleased with my first indie polish created by someone else! I can't wait to try out my other two colors, as well as every other indie polish in the world!