Wednesday, October 23, 2013

DIY Iced Coffee: Wallet Friendly Wednesday

Last Sunday, I showed you my recipe for homemade caramel sauce, and promised to show you me recipe for iced coffee that goes along with it! 


This right here is my weakness. This, for several years, was my morning wakeup call. And while, like any junkie, I scoped out the places with the best deals, this single can of Java Monster typically runs about $2.89  a pop. That's almost $20 a week. So I resolved to create the perfect recipe that I could make at home for far cheaper. It's not the same things, by any means, but I like it well enough that I don't really miss the Java Monster. I did buy one for express purpose of photographing it for you, but I did drink it, I won't lie. It was great. But my iced coffee works just as well, and far cheaper! So I'll share my recipe with you, in case you are an iced coffee junkie on a budget as well. Even if you're not, it makes a great occasional treat. I'm drinking some right now! 


You will need:
Coffee- whichever grounds you prefer. I use the Walmart brand Dark Roast, as I like dark roasts, and it's a Great Value
An empty container- I mix up a gallon at a time, and use empty milk jugs
Milk- I prefer whole for the creamy mouthfeel
A separate empty container, for brewing the coffee- I use a half gallon pitcher
Liquid measuring cup and dry measuring cup
A small strainer
Your homemade Caramel Sauce
A cup!


When coffee is to be drunk cold, cold brewing is the preferred process, as hot brewing adds a bitterness that is not welcome in iced coffee. So rather than simply brewing coffee in your coffee pot and adding ice, you're going to cold brew it (if you're following my method, that it!) It results in a far smoother end result. 
Start by taking your half gallon pitcher and adding 3/4 to 1 cup of coffee grounds.


Coffee, cup, pitcher. 


Fill the pitcher with water. You'll want to stir it a bit to wet all the grounds.


Place pitcher in the fridge. This part requires a bit of patience, as it takes at least 12 hours for a full strength brew. I typically let mine sit for 24. I put in in as I'm making dinner one evening, and make the finished beverage as I'm making dinner the next.


Once your coffe is brewed, it's time to get down to making the good stuff! 


Start by filtering out your coffee. I use a small handheld strainer, but you can use whatever you have handy. Your half gallon pitcher will yield 6-7 cups of cold-brewed coffee. My recipe calls for 5 cups in the finished drink. I either freeze the extra as coffee ice cubes or just strain and bottle it for future use.


Once your coffee is strained out, pour it into your empty milk jug. Then it's time to add milk. I add 9 cups of whole milk. I prefer a creamier drink with a coffee taste, rather than coffee with a splash of milk :) 


Milk and coffee? Check! Finally, you'll want to add your flavoring/sweetener. I use 1/2 cup of my homemade caramel sauce. I prefer to add the caramel before the milk, so that I have plenty of room to shake it up and mix it, but I forgot to do so here. It's still shakeable and mixable, it's just heavier.


And here is the finished product: Iced coffee! I go through my gallon in about a week, so it will definitely keep that long. The recipe is easily customizable for both amount made and sweetness/creaminess preferences, so feel free to play around! To recap, the overall "recipe" is:

5 cups cold brewed coffee
9 cups whole milk
1/2 cup caramel sauce

Pour into the cup of your choice and enjoy! Let me know if you try it out, let me know what your morning vices are! Either way, I'd love to hear from you :)


Crumpet's 33DC: Abstract


I generally despise reality TV, but one of my guilty pleasures is Cake Boss! When a new season showed up on Netflix a few weeks ago, I marathoned the whole thing in a weekend while playing with polish. When the abstract prompt came up, I knew where to turn! There was an episode called "Chandeliers & Christenings" which featured an artist who created colorful abstract blown glass chandeliers. My Google-fu is failing me, and I can't find the guy's name, but these chandeliers were both funky and magnificent! That's what I've tried to recreate with my mani today.


I started with a base of Orly Nite Owl, then used some neon art stripers (Kiss Nail Art Beach Green, Bikini Pink and Pearl Blue, Sinful Colors Me First), to randomly swirl on some lines. Overall, I like the result!

Check out the rest of the abstract manis in the InLInkz below!


Tuesday, October 22, 2013

CNT Halloween Challenge: Spiders


I adore Halloween, and everything about it, with one exception: Spiders. I HATE spiders. I loathe spiders. I fear spiders. They have way too many legs for their own good, and no business being in my shower. That said, I'm okay with depictions of spider webs, as long as they're not real. But if anyone does realistic looking spiders for today's challenge: I'm so sorry, but I won't be able to read your post!


That said, here is my spider nail art. There are a lot of layers involved! I started with a straight black base. Then I layered on a coat of Sinful Colors Black Magic, then two coats of Sinful Colors Glow In The Dark. (Damn you, Walgreen's and your 2/$3!) Glow In The Dark, sadly, did not glow in the dark. At least I wasn't able to make it do so. Anyway: stamping (both webs and spider) are from QA plate 26. The webs were done with Revlon Speed Dry Spirit, and the spider is Sinful Colors Ruby Ruby. 


I love the slightly dimensional look of Black Magic under the webs! 

Be sure to check out more spider manis in the InLinkz below- if you're not afraid of spiders, like me!


Monday, October 21, 2013

Crumpet's 33DC: Chinese


Chinese culture is something that I really don't know a lot about, so Google was my friend for today's prompt! I came up with these gorgeous dresses that seem to be for Chinese New Year festivals: 


And I decided to pattern my nails off of them!


I started with Sinful Colors Ruby Ruby, then did my designs in Sally Hansen Xtreme Wear Golden-I. The index and middle finger designs were freehanded with dotting tools.


These two fingers were stamped: Red Angel plate RA-109 and QA15. I wish I had stamped all of them, as I love the delicate look here! I also wish I had a better gold for stamping, but what are you gonna do?

Be sure to check out more Chinese themed manis in the InLinkz below!


Halloween Colors: Wet N Wild Sunny Side Up & NYC Lexington Yellow


Squee! Halloween is fast approaching! Of course, that means my nails are pretty much all Halloween related for the next week and a half! Today I'll be showing you my favorite orange and yellow, the classic Halloween colors :)


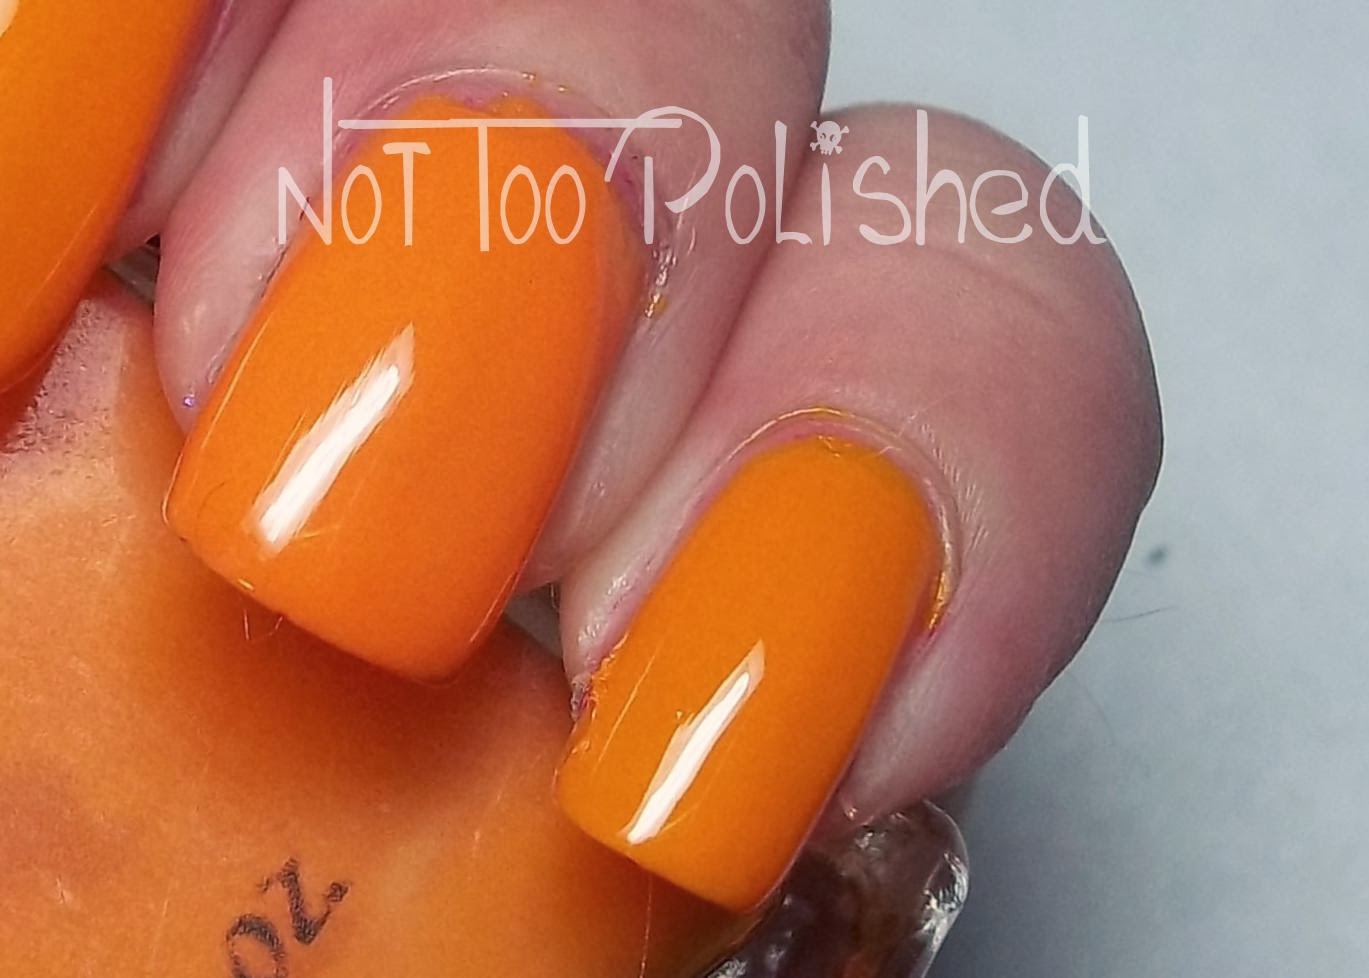
The orange is Sunny Side Up by Wet N Wild. It's a lighter, bright orange than most orange you see this time of year. It's not really a pumpkin orange, but it works well nonetheless! Photos show three coats, topped with Out the Door, taken under Ott Lite. 


Sunny Side Up is a bit streaky, but it does self level and even out after three coat. At a buck a piece, and available pretty much everywhere,  I'd say it's totally worth it! In fact, my bottle is getting a bit low, and I think I'll need to grab another!


And my favorite yellow is Lexington Yellow by NYC. Again, it's a bit on the lighter side, but it pairs perfectly with Sunny Side Up, and makes for the most adorable candy corn combination ever :) 
Sadly, my relationship with Lexington Yellow is a bit love-hate. I absolutely adore the color, and it's the perfect yellow for me! But the formula is atrocious, even for a yellow. The above photo is four coats. FOUR! And it's still a bit streaky. Now I know yellows have a history of dodgy formulas, but I have several yellows in my stash that perform well enough (for other colors) or even exceptionally (for yellow). But none of them are this SPECIFIC shade of yellow. Which is what I want, but haven't been able to find. So I persevere, because I love the color, but I'm seriously on a dupe hunt. If there's a duplicate for this color in a similar price range (about $2), please let me know, I'll be all over it! 

What are your favorite colors for Halloween? Let me know in the comments!


Sunday, October 20, 2013

Homemade Caramel Sauce: Wallet Friendly Wednesday (on the Weekend!)

I've had the pictures and idea for this post down for a while, but for some reason, haven't gotten around to posting it. I'm trying to expand my blog a little bit to include a few more of the things that I really enjoy. One of them is cooking. More specifically, cooking those odd things that most people would really just rather buy. I make my own barbeque sauces, I make my own caramel sauce to put in my iced coffee and I recently made the foray into homemade mustard. It went surprisingly well. 

Today I'll be showing you a step by step how to make caramel. I was scared of this for such a long time, as caramel is one of those things that seems really tricky. It goes from perfect to burned in literally about 5 seconds. But it's really not that difficult, and the only special too required is arrention. Once you get the hand of it, it's quick easy and painless, not to mention way cheaper than buying caramel ice cream topping or those flavored coffe syrups. Next week (actually ON Wednesday this time) I'll be showing you how to brew and mix the iced coffe that is my life line every morning :)

Warning: This post is EXTREMELY picture heavy.


You will need: White sugar (1 cup)
A medium to large sauce pan (a larger pan will heat more quickly, but will also burn more quickly)
An empty bottle
Whole milk or Heavy Cream (1 1/4 cup. Cream will make your caramel richer, but milk is cheaper)
A liquid measuring cup
A SILICON spatula (Seriously. Melted sugar gets HOT, and it will melt your plastic stirring implements. Trust me.)
A funnel. Not pictured. 

You will not need a tea kettle, but that's where mine lives, and I didn't move it. 


Start by putting one cup of white sugar in your pan. Shake it a bit so that the sugar covers the bottom evenly. 


Turn on your burner to a medium-low heat. As you can see, I put mine at about a 3 on a dial that goes to 7. Your stove will obviously vary, and as you gain confidence with the technique, you'll know the best setting for you. 


Set your timer for 7 minutes. This is approximately how long it will take for your sugar to start to melt. Again, your stove will vary, and I recommend staying put and keeping an eye on it the first few times you try this. I now can walk away and tidy up the kitchen, do some dishes and whatnot during that first seven minutes. The timer beeps to let me know it's time to start paying attention. 


While your timer is going, measure out 1 1/4 cups of milk or heavy cream and warm is up. You can either heat it on the stove in a separate sauce pan from your sugar, or you can just microwave it. I microwave mine, 20 seconds at a time for a total of about a minute. It needs to be warm, but it doesn't need to be steaming hot. Once it's warmed up, take it over to the stove so that it's ready to go when you need it. 


7 minutes are up. Just around the edges of the sugar, you can see that there is a little line where it has shifted. This means that it has started to melt. It now requires your full attention.


You don't want to full on stir the sugar, but you do want to redistribute it so that it melts evenly. Using your silicon spatula (or wood, but NEVER plastic), gently push the sugar around so that the melted sugar is off of the direct heat, and fresh unmelted sugar can take its place. 


It will look pretty chunky for a while. Eventually, all of the sugar in the pan will be golden brown and syrupy. In my experience it takes another 5 to 6 minutes to reach that stage. 


We're almost there . . .


Now, the majority of my sugar has melted, and it's time to add the milk. It's a bit of a finnicky process, and I wasn't able to photograph my self both pouring and stirring at the same time. But you want to add your milk in very small increments, stirring constantly. I pour mine directly out of the measuring cup about 1/8 of a cup at a time. It will get very steamy and frothy. This is normal. Just keep stirring until the frothing dies down and the liquid is smooth again. Then add a little more milk and repeat until all of your milk is added. 


If you add your milk too quickly, your caramel will seize. Mine has done so here. This means that it will cease to be a smooth and creamy liquid, and will break into hard little chunks of toffee floating in caramel flavored milk. ALL IS NOT LOST! This is fixable, and it happens to me probably 1/3 of the time that I make caramel. It takes a little more time, but the end results are the same. 


If your caramel has seized, you can go ahead and add the rest of your milk in one go. It won't seize any more than it has. If you managed to incorporate all of your milk without siezing, congratulations!  You can skip to the next step.

Once all of your milk is added, you'll need to remelt the toffee bits into caramel. Keep stirring your liquid, and you'll hear them clinking around in the bottom of the pan. You'll also feel them as you're stirring. Just keep the heat going, and keep stirring, and they will eventually remelt, I promise. It will seem like it takes forever to do so, but they WILL. It can take aywhere from 3-10 minutes, depending on how badly the caramel seized. 


Once you have a smooth and creamy caramel mixture, either from perfectly executing the addition of mik or from remelting your toffe bits, you'll need to clean the pan and spatula a bit. In the last step, you can see some caramel clinging to the side of the pan above the liquid line. In this step, I've run my spatula around the pan to get it all off. I then use a regular teaspoon to scrape the caramel off of the spatula and plop it back into the liqiud. Give it a few stirs to melt and incorporate it back into the sauce. 


You now officially have caramel sauce! As I use mine primarily for coffee flavoring/sweetening, I tend to leave mine fairy thin. If you'd prefer something thicker, you can keep simmering it over that medium low heat until it's almost, but not quite, entirely unlike tea. Wait . . . sorry, that should read: until it's almost, but not quite, as thick as you want it! It will thicken slightly while cooling. 


Remove your pan from the heat to a cooling area. It will cool surprisingly thickly. By the time I'm done cleaning my pan, readying the supplies for bottling and getting my coffee ready (come back Wednesday to see that post!), my caramel is cool enough to handle. 


Once your caramel has cooled (10 minutes is plenty cool enough), ready your storage container (I use an old Torani syrup bottle, and it's the perfect size for one batch of caramel) and your funnel. 


Slowly pour your sauce into your bottle, being sure to scrape the pan with your spatula to get all of it. You don't want to waste any!


Et voile! Bottled caramel, ready to add to anything in your life that is lacking in caramelly goodness. 


Protip: Fill your pan immediately with hot water. This will make cleanup much easier. 

A few other tips, before I post the "simplified" recipe:

 I have never tried to double (or triple or anything) this recipe at one go, but I have heard that it becomes far more difficult, and easier to burn. One batch typically lasts me about two weeks (or two gallons of coffee), so I've never felt the need. Double at your own risk!
You can speed up the melting process by using a larger pot. This does, however, highly increase the risk of burning. The pot I typically use is my "medium" sauce pan. You know how when you buy a set of pans, you get two sauce pans and a bigger soup pot? I use the larger sauce pan. I have used the soup pot a few times, but burned it about half of the time. 

Caramel does burn very easily. You will definitely need to pay attention while you're making it. It is not a make a walk away treat. That said, don't let that warning fool you, it's really not a scary process at all!

SIMPLIFIED RECIPE: 
1 cup white sugar
1 1/4 cup whole milk or heavy cream

1. Place sugar in a medium sauce pan over medium low heat. Heat milk on stove or microwave.
2. Once sugar begins to melt, gently move it around the pan to allow all of the sugar to come in contact with direct heat.
3. Once all sugar is melted and golden brown, begin slowly adding milk, stirring constantly. 
4. Once all milk is incorporated, simmer over medium-low heat until desired consistancy is achieved. 
5. Cool and enjoy!


There you have it ladies, my favorite NPR treat! Please let me know if you try it out, and how it turned out for you! Or let me know about any other odd things you like to cook! 


Daring Digits Mage: Swatches and Review

Are you absolutely loving this fall weather?! I'm up (relatively) north in central Wisconsin, and it's only been the past two weeks or so that it has finally turned into fall. I still had my air conditioner turned on at the end of September! Just this past week, we dipped to freezing during the night, which may sound unpleasant, but I love the cool crisp mornings and evenings. It also means that the daytime high typically hovers in the 40's and 50's which, to me, is perfect fall weather. Perfect for my favorite sweater, perfect for yummy soup in the crockpot, perfect for snuggling with kitty on the couch, and perfect for Halloween!


In the spirit of all things Halloween related, I have another Daring Digits polish to show you today. Just like Warlock, which I showed you on Wednesday, Mage is actually from and old World of Warcraft collection, but the "magic" connotations, not to mention the color, make is a great fit for Halloween as well! 


Mage is a very sheer dark red jelly with a purple-y shimmer, iridescent hexes and squares and purple and holo hexes. It is the darker, more brooding sister to Warlock. Photos show three coats alone, topped with Out the Door. All photos are taken under Ott Lite. 


As I stated in the Warlock review, I am not at all bothered by visible nail line, and in some cases I enjoy the look. I like sheer polishes, especially in the spring and fall for some reason, so I will wear Mage as is and love it. For those of you who need a more opaque look, layering is the way to go.


Here, I've layered two coats of Mage over Sinful Colors Runy Ruby. I wanted to bring out the red tones, but I think it looks too similar to Warlock, which I also layered over a bright red. Expect to see a revisit on this baby: I'd like to see her over a purple, and I think that shimmer would really pop over a black!


That pinky-purple shimmer does show up really nicely over the red though! Mage, just like Warlock, is a "super jelly" and requires a bit of patience to apply. Not that it's difficult but, as jellies tend to do, it does drag a bit when you don't let each coat dry before applying another. Also, like Warlock, it has a strong, almost acrylic-y smell. Neither of those things will prevent me from wearing this polish, however, as it's a stunner, and I think it will look fabulous over a variety of colors. Of the two, I definitely prefer this one. That purple shimmer adds that extra touch that puts it over the top!

Mage was a part of a World of Warcraft collection released last year, and is no longer available through the Daring Digits store (which you should still check out, as I have never been disappointed in a Daring Digits polish). It is, however, still available through Mei Mei's Signatures. 

*Polish was won through a giveaway. All opinions expressed are my own.