Showing posts with label red. Show all posts

Monday, February 11, 2013

Bobbing for Apples by BNVS Nail Color

Ladies, I really hate to do this to you, but I have to show you a color today that is, sadly, not currently available :( But it's such a lovely, shimmery red, perfect for Valentine's Day.


Meet Bobbing for Apples by BNVS Nail Color. Shown is two coats, topped with Out the Door, under Ott Lite. 


Bobbing for Apples is a rich, bright, true red with red and pink shimmer. 


I rarely enlarge photos when I read blog reviews, and I don't recommend it very often, but the shimmer in this polish is quite stunning. Enlarge away!


Bobbing for Apples was a part of BNVS' Fall 2012 color line, and I'm told it will be making a comeback in fall of 2013, so keep and eye out for it!


The bottle and smell on this polish were the same as the others I've reviewed from BNVS (Bootiful and Candy Craze), but the formula really hits it out of the park. The creme formulas were great, for what they were (a yellow creme is a pain, no matter what!), but the shimmers- glide on like buttah, and full coverage in two coats. No pooling in the cuticles, which can be a nightmare when it comes to red. And this particular red actually cleaned up quite easily. 

If you haven't checked out BNVS Nail Colors yet, I highly recommend it. Check out BNVS on Etsy.


*This polish was provided to me for an honest review. 


Friday, February 8, 2013

Cupid Stunt by Flash Your Tips: Swatch and Review

Good morning my lovelies! Do I have a busy weekend for you, or what? I've got quite a few posts planned each day, as I have several Valentine's inspired polishes I want to show off with enough time to order, I still owe you two days from Crumpet's 31 Day Challenge, and I want to give you a good look at my new polishes! We'll get right down into the first post:


Today's polish is Cupid Stunt by Flash Your Tips. Cupid Stunt is from the brand new All My Sisters Collection, and while the name implies VDay, it is really not holiday specific. This is two coats over Sinful Colors Black on Black, topped with Seche Vite. Photos taken under Ott Lite.


Rachel from Flash Your Tips calls Cupid Stunt "a fabulous Glitter topcoat", and she couldn't be more right! This polish is soo blingy, my camera just spazzed out. It's a clear based topcoat just packed full of silver holo micro bars and hexes, accented with red satin hexes. I went with black undies to show the bling to its fullest, but the possibilities are endless: over pink or violet to play up the Valentine's angle, over blue for Independance/Memorial/other American patriotic holiday, over golds and oranges for fall, over green for Christmas . . . don't let the name fool you into thinking this polish is a one trick pony. 


Blurred out photo to show all the holo-y goodness. This is definitely a distracting polish in the sun!


Yay, my camera finally caught a good one! This polish is super packed with glitter, and thus required a bit of patience in application. The glitters had a tendency to clump a bit, and needed to be spread out. For the glitter payoff, I don't think that's unreasonable, or even unusual. This polish could probably be opaque (though quite blinding!) on it's own at 4-ish coats. 

I have all four of the All My Sisters polishes (you can see Daisy Chain here, the rest will be up later this weekend), and picking a favorite is just . . . not possible :) Cupid Stunt was definitely the most eye-catching right out of the package, but the color combinations that Rachel has created are truly unique, and quite stunning. Check out Flash Your Tips on Etsy and Facebook. There is a giveaway on the Facebook page if you act fast! 


*This polish was provided to me for an honest review. 


Thursday, January 24, 2013

New 31DC: Inspired by a Game


Today's prompt was a no brainer for me- my family plays a lot of games, and most of them are card games!


I started with a base of BNVS Bobbing for Apples (review coming soon!) on all fingers. I then drew out suits with a sharpie. I filled in the club and spade, and filled the negative space around the heart and diamond, with Sinful Colors Black on Black. The Q-A-K-J were done with a dotting tool and polish. I love this mani so much- red and black are just classic together, and cards are always so much fun! I can't wait to redo this mani the next time we have a card night :)

Be sure to click all the links below to see which games the other challengers were inspired by!


Saturday, January 12, 2013

NEW 31DC: Tape


Today's New 31 Day Challenge prompt is tape. I was a bit unsure of this one, as tape manis can be amazing, but incredibly time consuming, or quick and simple, but maybe a bit boring. I didn't think I would have the energy and the ambition to create something truly stunning . . .


. . . but boy, was I wrong! I am so in love with this finished product, I would have worn it for the rest of the month, if I could figure out how!This did take forever. Probably about an hour and half, overall. Totally worth it! I started with a base of Revlon Speed Dry Spirit (white creme), then taped and taped and taped some more, then used painted over using Sinful Colors Black on Black and Ruby Ruby.

Sorry for the extreme mess- I think the tape took so much out of me that I kind of forgot about clean up :(

What are your thoughts? Would you put this much work into a one day mani? Don't forget to check out the rest of the amazing tape manis in the links below!


Tuesday, December 25, 2012

12 Days of Christmas: Santa Claus

Merry Christmas, dears! I hope your days is truly joyous, and that you get to spend time with loved ones, fawn over gifts given and received, and eat tons of yummy holiday foods! And if you don't celebrate Christmas, then happy Tuesday to you, and I hope that you have a wonderful day as well :)


This is, of course, the final prompt in the 12 Days of Christmas challenge, but I've had so much fun, and met/followed so many new and wonderful people, that I'm already planning my next challenge, beginning January 1st! I want to give a huge thanks to Kristine at Pink & Polished and Lorene at Over Polished for setting this up, and also to every single person who participated! Enough gushiness, and onto my Santas!


I will not take credit for this idea, as I've seen variations of it in several places, but I didn't use a specific manicure as a "tutorial" or thing to copy, so I won't credit a specific person either. Thinking about it now, Santa's Suit doesn't have a red stripe in the MIDDLE Of the white, and that was really a lack of thinking on my part :) But I love the overall turnout of this!

I started with a base of Volcano Burst by Free Hippie, a gorgeous, easy to work with red packed full of gold shimmer. I used the largest dotting tool I had to dot/swirl on the white with Sinful Colors Snow Me White, then used the same dot/swirl method to draw on the belts with Sinful Colors Black on Black. The buttons were dotted on with Black on Black and a smaller dotting tool. 

Once again, to all of you, thank you so much, and Merry Christmas!


Sunday, December 23, 2012

12 Days of Christmas: Elves!


So today's prompt is Elves, and I wasn't too excited about this one. I knew I couldn't pull off little elf faces, so I was at a loss. Then inspiration struck, and I decided to go abstract again!


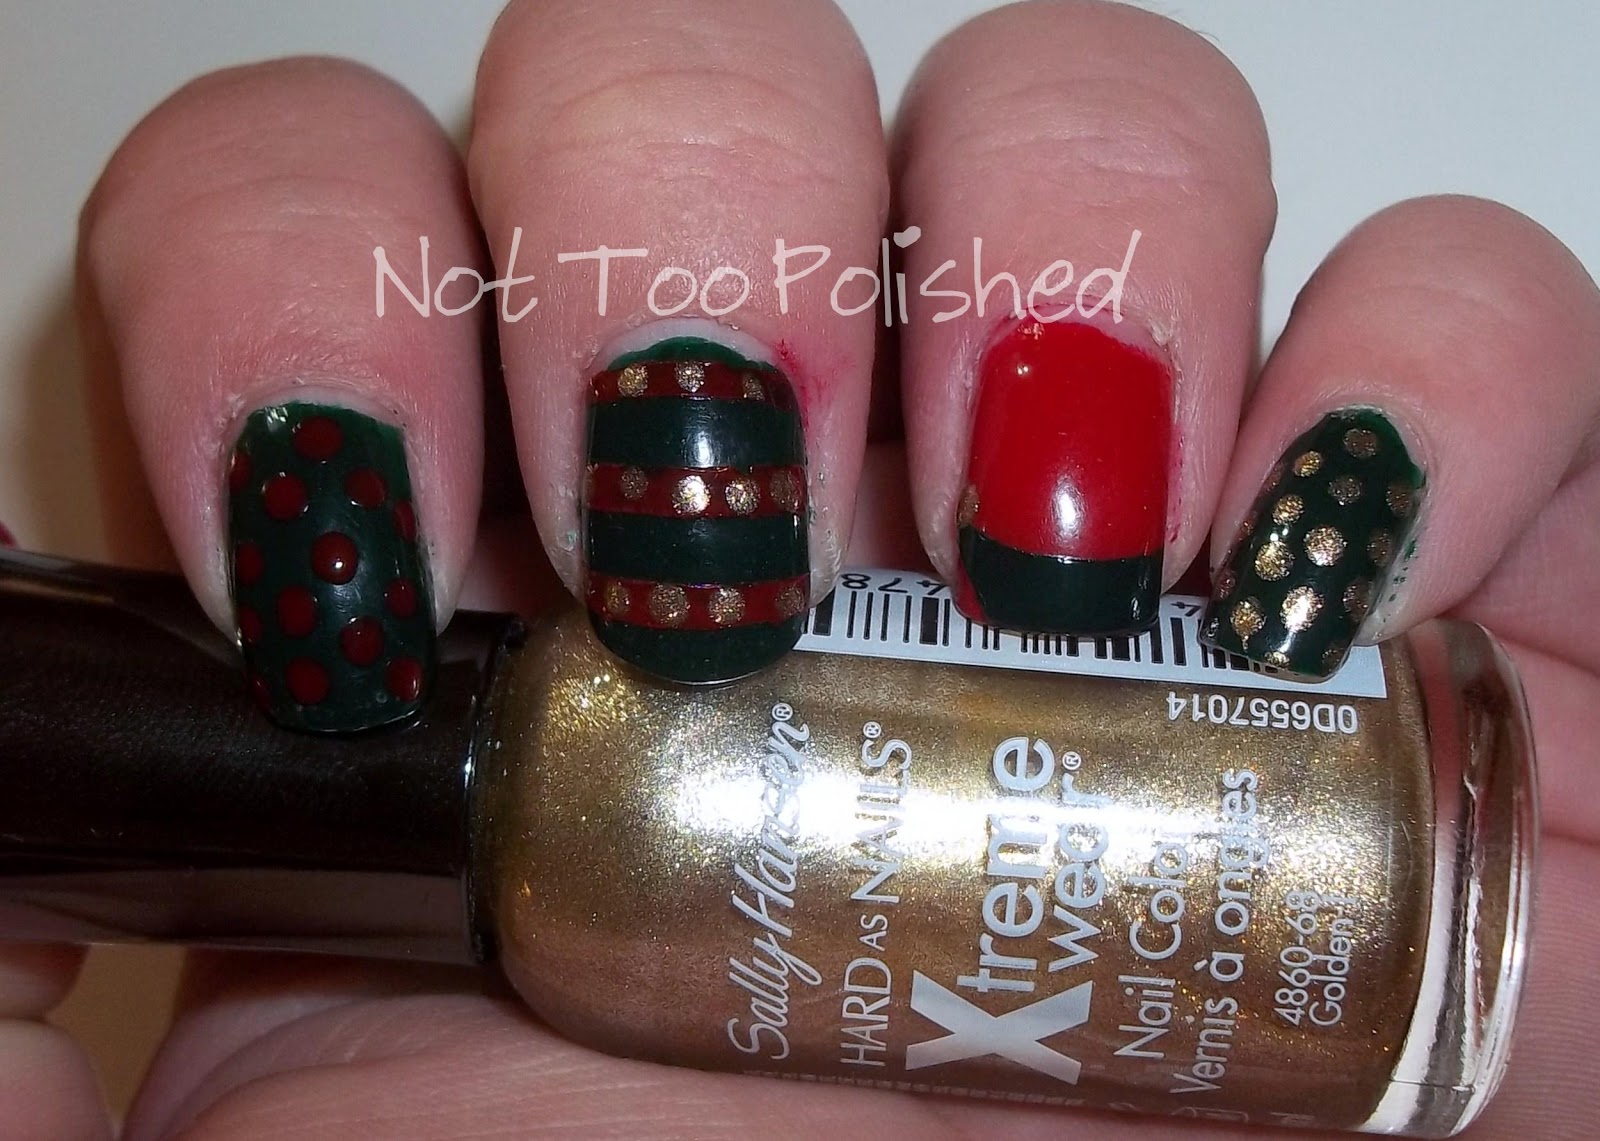
I started with a base of Sinful Colors Last Chance with an accent nail in Sinful Colors Ruby Ruby. I taped off my middle finger to do the "elf tights" in Ruby Ruby, then added the dots in Sally Hansen Extreme Wear Golden-I. The dots on my index are Ruby Ruby, pinkie are Golden-I, both done with dotting tools.


There is a much better view of my accent nail here, and I kind of love it! I used French tip guides at a cockeyed angle to create my elf shoe in Last Chance, then dotted on the jingle bell tip in Golden-I. I was worried about how this would turn out, but I wish I had done the shoes on all my fingers! 

To fulfill my indie requirement, I used Slippery When Wet (unscented) top coat by Wonder Beauty Products.


Be sure to check out the other elves below, and come back tomorrow for tinsel!


Saturday, December 15, 2012

Slip a Sable Under the Tree: Santa Baby by 365 Days of Color

Is everyone else totally ready for Christmas? My shopping is done, I'm finishing up all the wrapping today, baking next week for work and family, and my nails are now some version of Christmas-y from now until the big day! 


Today's beauty is Santa Baby, by 365 Days of Color. I have it layered here, L-R: three coats alone, and one coat over Wet N Wild Red Red, Sally Hansen Ton of Bricks and Pure Ice Iced Merlot. 


Sunny from 365 Days of Color says that "Santa Baby is a true red jelly polish jam packed red small metallic glitter and several different sizes of white glitter. THIS POLISH SMELLS LIKE CANDY CANES!!!! My favorite treats during the holiday season. "


As red jellies tend to do, this polish appears rather pink if you try to wear it alone, unless you use a ton of coats. I layered this here: two coats of Santa Baby over Sinful Colors Ruby Ruby, topped with a coat of Seche Vite. Photos taken in natural sunlight. 


I have the whole trio of 365 Days of Color's Scented Holiday polishes to show off in the coming days, and I honestly can't pick a favorite. I love all three of them! Santa Baby is so juicy and squishy looking. It's like a candy cane boiled down into syrup, then poured on the nails. It is best layered, and, in my opinion, a bright true red brings out the best in this color. Application was smooth and easy, no glitter fishing or placing needed. The candy cane scent is bright and cheery, but to me it smells more like a cherry mint. There's definitely a fruity note to it. The scent on this polish is my favorite of the three, not too strong, and lasted two days even through topcoat. It may last longer, but I took it off after two days :)


And here's a bonus picture, featuring a scarf that I just finished knitting as a Christmas gift! The sun was hitting the polish just right, making it look amazing and glow-y, I had to snap the photo without moving.

365 Days of Color polishes can be purchased here, and liked on Facebook here. Sunny also keeps a great polish blog, here. Most of the 365 Days of Color shop is currently on sale, including the Holiday Collection and Miracle Balm and Cuticle oil (which you NEED to try, if you haven't!). Sunny also just released a new line of hand creme, in limited scents, that I can't wait to try! 


Friday, December 14, 2012

12 Days of Christmas: Gifts!


Sorry this post is going up so late, especially as I had it done way early today, but I had the day off and spent nearly the whole thing on nails! Swatching, and nail art, and planning, and even working on some new colors :) Without further ado . . . here are my Gift nails!


I chose the wrapping paper that I'm using this year as my inspiration. As you can see, it is mostly red and white. There is a red with white snowflakes paper as well, but it's on a different shelf :)


Here is my interpretation. I started with bases of Maybelline Color Show Porcelain Party and Sinful Colors Ruby Ruby. Then, using the opposite color I stamped on designs from my Salon Express Stamper kit (peppermint and dots), QA 15 (the sweater design) and QA 5 (bows). The bows were stamped on with A England King Arthur, and unfortunately, I think they kind of ruined the whole thing. It wasn't quite top notch to begin with, but King Arthur is waay too sheer for stamping. So it kind of looks a mess. 

Be sure to check out all the other challengers in the links below! And come back Sunday for some snowflakes!


Wednesday, December 5, 2012

12 Days of Christmas: Holiday Song!

Day 2 of the Christmas nail art challenge, and I'm on time! 


Today's prompt is Holiday Song, and I had a bit of a hard time with this one. I didn't want to do something like Rudolph or Frosty, because I knew my skills would not live up to painting a portrait on my nails! I had a really cute idea to do My Favorite Things, but I rejected it on principle- I've never understood why that is considered a Christmas song. So I went with just music in general, with a Christmassy theme. 


I started with two coats of Sinful Colors Ruby Ruby, topped with two coats of 365 Days of Color Santa Baby (see the full blog review in a few days!). I used a black Sharpie to both block out my designs and create a shadow effect (I figure if acrylic paints are allowed, then so is permanent marker, damnit!). Then I used a striping brush to go over my Sharpie with Sinful Colors Heavy Metal and Chirality Katydid. If you're not musically inclined, my index finger is a treble (high notes) clef, my middle is eighth notes (fast ones), my ring is quarter notes on a staff (don't care for how they turned out) and my pinkie is a bass (low) clef.  Hope you enjoyed, and be sure to check out all the other challengers in the inLinkz box!


Sunday, November 4, 2012

Meet Me Under the: Merry Mistletoe by Twenty Seven Polish

I am so beyond excited to start showing off Christmas polishes! I love Halloween, and the two holidays are pretty close to tied for my favorites, but I think Christmas may just win. By a VERY tight margin! Twinkling lights, fresh baked cookies, beautiful dustings of snow on the trees in my backyard (as long as I don't have to go out in it!), plus I LOVE shopping for my loved ones. And for me, the holiday season pretty much starts November 1st!


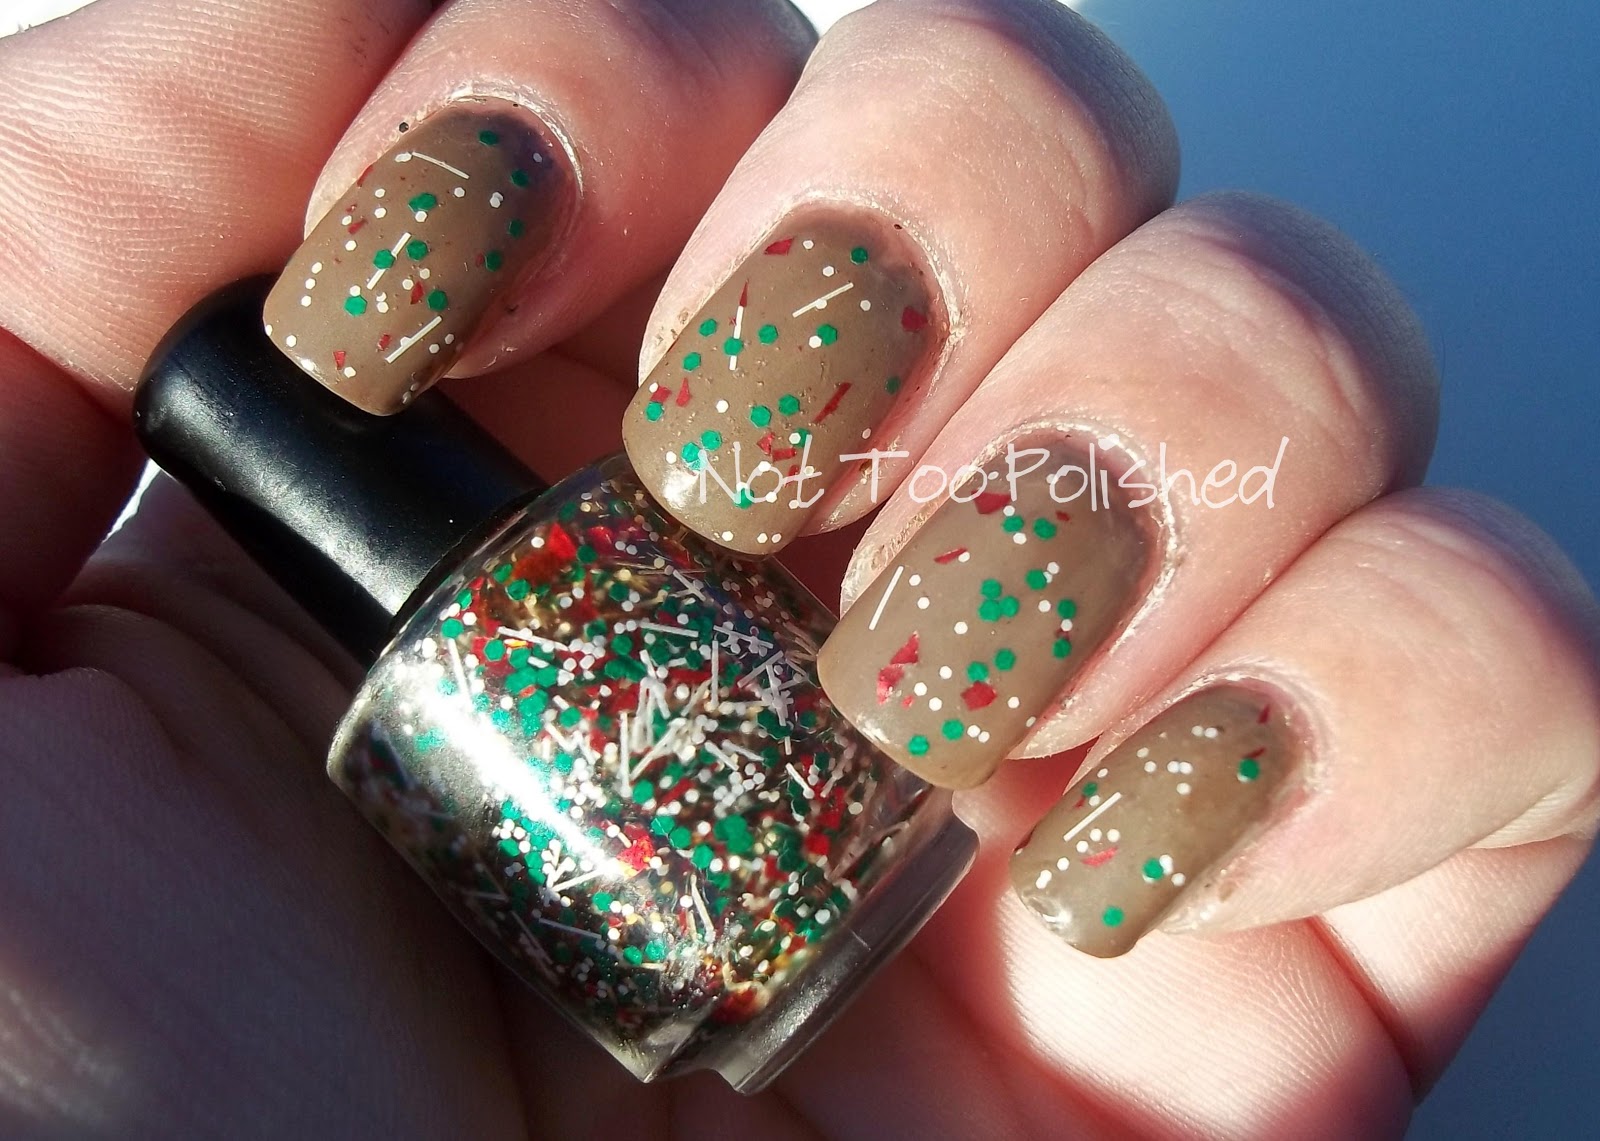
The first Christmas polish that I have to showcase this season is Merry Mistletoe by Twenty Seven Polish. Lisa from Twenty Seven describes this as "a clear base that is mixed with snowy white matte hexes and bars, green matte hexes, and shreds of very merry red." The main Etsy photo for this polish has it shown over a lime green, which I wish I'd thought of, because I love it!


The look I DID go for, however, is two coats of Merry Mistletoe over Sinful Colors Nirvana. Topped with NYC Matte Me Crazy, photos taken in natural sunlight. I wanted this polish to look like sprinkles on a Christmas cookie, and damn if I didn't succeed! To me these nails look just like a gingerbread cookie, coated with jimmies and nonpariels!


See what I mean? Now I want gingerbread . . . I'm the only one in my family who eats it, so I usually don't make any :( 

Merry Mistletoe applied very well. The glitter was well mixed, and came out evenly and without issue. It is a little sparse, which means that you can customize the amount of glitter you want on your nails, which I love. I actually like the bars in this (and I'm not usually a fan of bars), because it made it a bit more dintinctive. They also didn't give me any trouble at all, which helped. This combo looked great shiny, of course, but I had to matte it, so that it looked more like a cookie!

I've reviewed a few Twenty Seven polishes before, of course: Space Cadet and Fake ID. I've been sitting on this one, because I really wanted to wait until I felt Christmas-y to show it off, which is sad, because it's such a fun combo! I want to pick up a slightly shimmery beige-y kind of color to try a sugar cookie look next!

Twenty Seven Polish can be purchased on Etsy, where full sized bottles run $7 and minis are $3. This is the only Christmas polish I see yet, but there are plenty of other fun glitter toppers, plus a few color+glitter polishes listed. Lisa has also just released a color change polish! Go here to like Twenty Seven on Facebook.

Support your indies, ladies!
Cheers,
-Liz-


*This polish was provided to me for an honest review. 


Monday, October 22, 2012

TIHNAC: Gradient

I'm baack! And I have another basic tecnique which I have never tried: gradient. At least, I've never done them properly, with a sponge and everything. I have done some fail-gradients by just sponging on with a Qtip, but this was was quicker and easier!


Excuse my horrible cleanup- this red was stubborn as hell!


I started with a base coat of Sally Hansen Ton of Bricks, then using a cosmetic sponge, dabbed on (top to bottom) Ton of Bricks, Sinful Colors Inkwell and Sinful Colors Black on Black. This isn't super strictly Halloweenish, but if I were ever a devil for Halloween, I would definitely come back to this look!


Then, in keeping with my indies, I added a coat of Darling Diva Polish's Diabla over the whole thing. This had the double benefit of an extra layer of devilishness, plus it made my color lines blend together a bit better! I'm overall pretty happy with the way this turned out, and I'm getting scarily into this whole nail art thing! 

Be sure to check out all the lovely other participants!
Cheers,
-Liz-
.


Sunday, September 30, 2012

Birthday LOTD and Nail Art

Today's post does not feature a review (at least not in the standard sense). It's just me showing off :) My birthday was a little more than a week ago, and to celebrate, my two best friends (both male) and I road-tripped up to the Mall of America- about a three hour drive from home. I was privledged enough, while shopping with two men, to walk through the doors of Sephora for the very first time! Sadly, I did not purchase anything, as I was absolutely terrified! Of the selection, of the price tags (!), and of the 30 people working in a store the size of a slighty larger than average gas station. 
While I drooled over amazing brush sets, Kat Von D color palettes and Nars Orgasm (which I really wish that I HAD purchased!), the boys were very sweet and patient with me. Zach called my attention to many things he though I would enjoy. And Dane discovered the polish bar! When I said today's post didn't feature a review, I meant by me :) While I, very unfortunately, did not manage to capture any photos, I do have a few quick man-thoughts on some higher-end blue polishes. 

Julep Marisa and Nails Inc Primrose Park both earned a spot on one of his fingers, but he really didn't have anything to say about them one way or the other. 
Illamasqua Serenity (with the rubber finish) "dried funny. Isn't is supposed to be shiny?" 
Nails Inc Connaught Square (3D glitter) "Horrible! All the glitter was on one side of my finger, and then nothing on the other side!"
And finally, Nails Inc The Strand (star magnetic): "Really pretty, very cool. Even though I couldn't get the magnetic to work. You should have gotten that one."

So there you have a quick man-review of the blue polishes available at Sephora. 

Now onto the meat of this post: my nail art and makeup look for the day! If you follow me, you know that I'm not really into nail art. I'm bad at it, and it's time consuming. This mani took me three and a half hours! But I'm SO proud of the finished result that I had to show off :) All nails, and the makeup look, were inspired by things I found on Pinterest. I will link back to them when possible.


Left hand (featuring my favorite shirt, and the inspiration behind my black/grey/white mani)


Right hand

Polished used:
Sinful Colors Snow Me White
Sinful Colors Black on Black
a franken mix grey- equal parts black and white
Sinful Colors Ruby Ruby
Shimmer Polish Vanessa
Darling Diva Polish Diabla
Once Upon a Polish Scuttle


Left hand photo that actually includes my thumb. I used striping tape (for the first time!) to create most of these designs, plus dotting tools on my left thumb and both index fingers. If you want a full "how I did it" explanation, let me know and I'll post it! But for now, I'll just go through a few of the nails I was most happy with.


Left index: Base coat of Snow Me White. I used striping tape to section off the square in the middle and painted it with the grey franken. Once that was dry, I dotted on the black X. It seemed a bit bare, so I freehanded on the red on the sides. Bad idea. I had to go back with more tape and repaint the red. Overall: I love the argyle! Inspired by Topcoat It's Argyle Mani (I didn't follow the tutorial though!)


For the peekaboo glitter, I painted the whole nail with two coats of Shimmer Polish Vanessa. When it was dry, I randomly placed my tape and covered the whole thing with black. Inspired by this beauty from Madame Luck.

This one didn't end up anywhere near its inspiration. I tried to do something like this , but Ruby Ruby does NOT work well for stamping. So I started over. Grey base. Striped off the lines, covered it in white. Topcoat of Darling Diva Diabla. 

Other fingers were inspired by:
 A Girl and Her Polish (left thumb)
Manicurator (left pinkie)
Holy Manicures (right thumb)
Rin's Nail Files (right index)
The rest failed when I tried to execute something fancy, so I just kludged together stripes and whatnot. Overall, I am so incredibly happy with the way this turned out! But I won't be doing it again soon, as it took forever!


And because this post isn't long enough, a quick makeup rundown as well! I tried to copy this look from Bows and Curtseys, also found on Pinterest.


Products used:

FACE:
NYC Smooth Skin Perfecting Primer #684
Loreal True Match Liquid Foundation in Alabaster
Loreal True Match Pressed Powder in Alabaster

EYES:
Hard Candy Eye Shadow Primer
Cover Girl Perfect Point Eye Liner in Black Onyx (waterline) 
Sundara Cosmetics Loose Shadow in Edward (brow bone and inner corners) 
Sundara Cosmetics Diamonds and Coal (lid, and blended out above crease)
Makeup Your Face Red from the Stars and Stripes Creme Shadow Trio (red liner)
Sundara Cosmetics Bindi (red liner)
Rimmel Scandal Eyes Gel Liner in Black
Maybelline Lash Stiletto Waterproof Mascara in Very Black

LIPS:
Rimmel Lasting Finish Lipstick in Scream
Black Widow Balm in Kiss of Death

So, there you have my look of the day, all in one incredibly long post! Hope you liked, and we now return you to your regularly scheduled Indie Reviews :)

Cheers, 
-Liz-