Thursday, January 31, 2013

NEW 31 Day Challenge: Recreate Someone Else's Mani!


The final day, day 31! I'm a bit sad to see the end of this challenge, but also a bit relieved! I'm so behind on my review work, and my creativity began to suffer a bit toward the end there! I do still have two posts to do to catch up- I was sick last weekend, so I'll post my Childhood and Country manis this upcoming weekend.

Before I get down to the LAST mani of the challenge, I want to express my thanks. First of all: Crumpet! This challenge was SO much fun, and really pushed my boundaries several times. Thank you for coming up with the whole thing! Second: to every single participant: every single one of your manicures was wonderful. Thank you so much for your creativity, your time, and the peek into your lives. And finally: to my readers! This challenge was much longer than any I've done previously, and was daily, so my regular posting style did change dramatically. Thanks for sticking with me! So, without further ado: here is my copy cat mani for today!


The mani I chose to recreate can be seen here. It is from the Merge or Melt day, by Dressed Up Digits. I loved this mani so much that I considered buying the polishes that she originally used! But I'm not a huge fan of magnetics, so I went with what I had on hand. I started with a base of Sinful Colors Midnight Blue, then sponged on a gradient with the same and Sinful Colors San Francisco. My peacock stamp didn't want to cooperate, so I ended up with this swoopy design. I think it's from RA-107. I stamped first with Sinful Colors Black on Black, then again off center with Essie Penny Talk.

Thoughts? What was your favorite mani from this challenge? It was so hard to pick just one- I considered doing one massive post with about 10 that I wanted to recreate . . . be sure to check out the rest of the recreations in the links below!




Wednesday, January 30, 2013

Celestial Descent by BG Cosmetics

As promised, today I have another polish to show off by Bitch Glitz, aka BG Cosmetics. 


Today's polish is Celestial Descent, "an opaque yellow cream, strewn with red, yellow and white glitter and flitter that looks like celestial rays of sunlight on your nails." 

This is not a creme polish. It is very shimmery, and almost frosty when worn layered on itself, as shown above- three coats, topped with Seche Vite. The "flitter" is a fun addition, though- sheer white satin shards :)


As much as I (surprisingly!) liked the pale yellow on its own, I decided to try to layer it as well, and wow! This is one coat of Celestial Descent over NYC Lexington Yellow, and I can't get enough of it! I always feel odd wearing yellow polish, as it is not at all complementary to my skin tone, but I just don't care! It's so bright and cheery, and this combination has me thinking spring for sure! 

This polish applied like a dream, either way I wore it. There is one shard glitter on my ring finger in the very first photo that I could not get to spread out and lay flat. Other than that one, rogue glitter- perfect.

Alone, it is a very pale, buttery color with a ton of shimmer and a touch of frostiness. It is very unobtrusive- pale and polite without being a basic nude or pink. Layered over a light yellow creme, it packs such a springtime punch. I truly can't wait for all this snow and ice to go away! 

Bitch Glitz polishes, as well as a few eyeshadows, can be purchased on Etsy. Full sized polishes run $10, while four piece collections can be purchased for $35- great deal if you want the whole set! Be sure to like Bitch Glitz on Facebook as well!


*This polish was sent to me for an honest review. 


NEW 31 Day Challenge: Your Favorite Technique


What is my favorite nail art technique? I'm not quite sure I have one. I most commonly just paint my nails a single color, but that isn't very artistic, now is it? Beyond that, the two techniques that I use most often are dotting and stamping, and I decided to go with stamping for this one.


I started with a base of Rimmel 60 Seconds in Stop Traffic, then stamped on top of it using Sinful Black on Black and a random plate from my Salon Express stamping kit. I'm not too thrilled about this mani, but I was still feeling rather ill when I did it, so . . . overall not too bad. I love the interlocking heart stamp, and I'll have to play with it some more- anyone else doodle these in the corner of their notebooks in grade school?

Check out all the manis in the links below- I'm excited to see what everyone else's favorite is!


Tuesday, January 29, 2013

NEW 31 Day Challenge: Inspired by a Blogger


Today's theme was a tough one! I follow so many amazing bloggers, not to mention all of the amazing manis put forth by all of the ladies participating in this challenge! I had so many set aside for the recreate day, that I thought I would use one of them for today :)


I was inspired by this mani by Nails by Ms. Lizard, but I was in NO mood to do a watermarble at the moment. So, as this one is only inspired, I added my own take on it. I started with a coat of Revlon Top Speed Spirit (creme white) and stamped using Sinful Colors Black on Black and the watermarble-y design from RA plate 107. I then took a few striping polishes- Kiss Nail Art Bikini Pink and Beach Green, and Sinful Colors Me First, and painted over most of the white areas left beneath the stamping. It took me a few nails to get the hang of it, but I ended up loving it! I especially love my ring finger, and how the neon yellow at the tip looks like a heart :)

There you have it, dears! Inspired by the lovely Ms. Lizard- be sure to check out her mani, as well as the rest of the challengers in the links below!


Monday, January 28, 2013

Candied Pillow by BG Cosmetics: Swatch and Review

Indie alert! Today's polish is from brand new indie, BG Cosmetics. BG, if you're not in the know, stands for Bitch Glitz. Love it! 


The first Bitch Glitz polish in the lineup is Candied Pillow. Ketlyn describes it as: "an opaque metallic lavender, speckled with silver, blue, pink and purple holographic glitter that sparkles and radiates color and vibrancy in the sunlight. All polishes are 3 Free and 15 ml bottles. They are all made with diamond dust for added chip resistance and longevity."


The first two photos show two coats of Candied Pillow alone, topped with Seche Vite. All photos are taken under Ott Lite. 

To be honest, this was not my favorite way to wear this polish. It reached opacity with no problem at all, but it was a bit frosty for my taste.
  

The next two photos show one coat of Candied Pillow layered over Sinful Colors Cool Grey, also topped with Seche Vite. 


Now this combo, I LOVE. The glitter was so much more captivating in one coat! Plus, it finished more "foil-y" than "frosty" over the grey. You'll want to enlarge that last photo- it's a stunner!

Candied Pillow applied very easily, and was surprisingly free of brush strokes. I noticed some slight, reflective-only curling in ONE of the medium blue glitters. As it was only one, it may have been a fluke, and it did lay completely flat on the nail. This polish did become completely opaque in two coats, but can be layered at one. I've never heard of an indie line adding diamond dust to their polish, which I think is a very neat addition! I can't comment as to wear time, as I only wore it one day. 

Bitch Glitz polishes, as well as a few eyeshadows, can be purchased on Etsy. Full sized polishes run $10, while four piece collections can be purchased for $35- great deal if you want the whole set! Be sure to like Bitch Glitz on Facebook as well!


*This polish was sent to me for an honest review. 


NEW 31 Day Challenge: Inspired by Your Favorite Color, featuring Physician's Formula


Today's prompt was to do a manicure inspired by your favorite color. Well, I'm a pink girl, all the way, but we already did a "pink day", way back on the 4th. We also did "Your Favorite Color Family" on the 6th. I wanted to do something completely different from either of those days, and I came across this beauty at Walmart, and thought it fit the bill!


This beauty is the Endless Color trio in California Goddess, by Physician's Formula. I didn't even know Physician's Formula made nail polish! I've always been a fan of their blushes and shadows, so I thought I would give the polish a try out. There is even a nail art guide along one side of the box, showing several different ways the colors can be combined. 


The bottles snap together- how cool is that?! They probably won't fit in a Helmer once they're stacked, but I keep my polish in standard desk drawers, and they fit just fine.  


As you can see from the photos, the California Goddess set that I chose contains dark but bright (does that make sense?) orange jelly, a lighter bright orange creme and a raspberry pink that is somewhere between a creme and a jelly finish. All polishes are shown at three coats, and there is no VNL to be seen from the jelly or the semi-jelly. The lighter orange (unfortunately, there are no individual polish names) was a bit streaky, but the other two went on perfectly. And can I just say how much I'm in love with that pink? I want a full size bottle, but I didn't see any polishes in the PF display, other than the sets. 

Physician's Formula can be purchased at Walmart, Walgreen's, CVS, et cetera. Pretty much: wherever drugstore brand polishes are sold. They were priced at $9.97 at Walmart, with a $2 off coupon on each trio, which I stupidly forgot to use. 

Have you given these a try yet? Will you? 

Be sure to check out the rest of the "favorite color" manis in the links below!


Sunday, January 27, 2013

NEW 31DC: Inspired by YOU

.

I struggled a bit with today's prompt. As I'm the one doing the nail art, and coming up with the ideas and color combinations, isn't EVERY nail art design I do inspired by me? So I thought. And thought. And thought some more. Ultimately, I decided to do something that was inspired by me, physically. Just like the Inspired by Fabric, and Inspired by Nature, I did this one based on looks alone. 


To explain slightly: I am very pro body modification. I have many tattoos, and even more piercings, and I've seen some gorgeous stamps out there with old school tattoo designs on them. Unfortunately, I don't have any of those stamps, so I made do with what I did have. 

I started with a base of Orly Night Owl (granted a little dark for my skin tone, but I just LOVE this color! Can't you tell? This is probably the 4th time I've shown it!) Then I stamped using Sinful Colors Black on Black. The stars are from an unnumbered Salon Express plate, and the wings and bird are from Red Angel plates whose numbers I can't quite recall (but will look up for you if you're absolutely interested). I dotted around the "tattoo" designs with my smallest dotting tool and some more black. I added a few dots here and there using Sinful Colors Heavy Metal to represent the piercings. 

This post, and this nail art, feel very personal, and while I try to be open and honest with my readers, I'm aware that many people still view body modification as an abnormality. I am proud of each and every one of my tattoos, and they all have a meaning that is deep and special to me. The piercings don't really have a meaning, but I just don't feel like I look like me without them! 


I know I promised you I would never show you my feet, but this doesn't really count, as I'm wearing shoes. I also had to show you at least one tattoo, right? I have matching lizards on the tops of my feet. With a name like Liz, you just can't go though life without being called Lizard at least a million times!
.


Thursday, January 24, 2013

New 31DC: Inspired by a Game


Today's prompt was a no brainer for me- my family plays a lot of games, and most of them are card games!


I started with a base of BNVS Bobbing for Apples (review coming soon!) on all fingers. I then drew out suits with a sharpie. I filled in the club and spade, and filled the negative space around the heart and diamond, with Sinful Colors Black on Black. The Q-A-K-J were done with a dotting tool and polish. I love this mani so much- red and black are just classic together, and cards are always so much fun! I can't wait to redo this mani the next time we have a card night :)

Be sure to click all the links below to see which games the other challengers were inspired by!


Wednesday, January 23, 2013

NEW 31 Day Challenge: Inspired by Nature


Hello, loves! Today is a very big day for me- our challenge prompt is Inspired by Nature. I wanted to do something to really challenge myself, and I fell in love with this photo. So I set about recreating it, and actually took step by step photos. So, without further ado, I give you my very first tutorial!


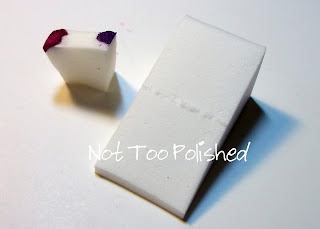
In addition to your polishes (which I will list with each step), you will need a cosmetic sponge. I cut mine up into about 9 pieces- on the left is the chunk that I used, versus the full sponge on the right.


I started with a base of Sally Hansen Hard As Nails No Hard Feelings, a lilac creme. Using a corner of my tiny sponge bit, I dabbed down the center of my nail using Sinful Colors Amethyst (a medium purple creme), making sure to let the lighter purple shown down the center. 

All sponging was done with a small corner of my tiny sponge pieces. I used about three bits throughout this design. Your mileage may vary, based on how many colors you use.


Around the outside of the Amethyst sponging, I dabbed on NYC In A Minute Battery Park Purple (dark plum creme). To lighten up the middle even more, I sponged on Sinful Colors Mauve (pale grey-lavender), covering most of the No Hard Feelings that I left open in the first step.


Around the outside of the Battery Park Purple, almost to the edges of my nails, I sponged on Sinful Colors Inkwell (blackened plum). 


On the very edges of my nails, I dabbed on Pure Ice Party Hard (dark navy creme). Then I randomly sponged on some Orly Fowl Play (dark purple flakie glitter) over the whole nail, to deepen the color and add some sparkle. 


The sponging part is done! Yay! At this point, I cleaned up a little bit, then painted over the whole nail with Revlon Glimmer Gloss Pina Colada Pop (gold iridescent micro glitter), to give the whole thing a night sky feeling. 


And the Grand Finale! Using the thinnest brush I had and a white creme polish, I zigzagged across the nail, through the lightest center part, branching out near the tips to create the lightening forks. I found that shaking my hands slightly made for a very nice, jagged electricity bolt effect. I topcoated (Seche Vite) while the white  polish was still tacky, which softened the lines a bit more.

What are your thoughts? Have you ever tried lightening bolt nails? What awesome power of nature inspires you? Be sure to check out the rest of the amazing manis in the links below!


Tuesday, January 22, 2013

NEW DC: Inspired by Fabric


Hello, dears! I certainly hope that you're warmer than I am today- our high here in Wisconsin was all of 2 degrees! (Fahrenheit)


Our prompt for the day was nail inspired by fabric. The above picture is a scarf that I absolutely fell in love with this winter- a mixed Nordic print, knit scarf in grey and berry tones- gorgeous!


Here we have my attempt to recreate said scarf. I had this mani planned out from the beginning. There are so many stamping plates out there with amazing "ugly Christmas sweater" images on them, and I love them so much, that it didn't even dawn on me that I didn't own any of them! I had to improvise :) My bases are Sinful Colors Cool Grey (index), Sinful Colors Cool Grey topped with a few coats of Sally Hansen Complete Salon Manicure Polar Bare (middle, ring) and Wet N Wild Wild Shine Tickled Pink. I then drew the designs on with Sharpie. That's right: I own a HUGE pack of Sharpies in every color imaginable, and while the colors aren't as vibrant as polish or acrylic paint would be, they give me much more control over the image I'm creating. 

What fabric designs are you constantly drawn to? Nordic knits and paisleys are definitely eye catchers for me! Be sure to check out the rest of the fabric-inspired nails in the links below!


Monday, January 21, 2013

NEW 31DC: Merge or Melt


Merge or Melt is another great prompt that is wide open to interpretation. Put simply, it is anything that causes your colors to merge, or melt together. Awesome! I thought I had this one in the bag!


I started with a beautiful grey gradient: base of Revlon Speed Dry Spirit (white), and then sponged on the gradient with Sinful Colors Cool Grey, NYC Sidewalkers and Sinful Colors Ardois. I loved this gradient so much that I promptly effed it up completely-


- with this mess! I tried to do a black, white and clear watermarble, so that my shades of grey would show through. Don't do this! I had moderate success using clear polish (Gelous) to watermarble with during my Christmas challenge, so I thought this would be easy peasy! I used Sinful Colors Snow Me White, Black on Black and Wet N Wild Clear, for the record. I gave up on the clear after three disastrous attempts on my index finger, and did a straight black and white watermarble. Which was . . . okay. I'm not incredibly proud of it, but every failure is a stepping stone to success, right? 


Does it look better at an angle? . . . not really. I did, however, learn three valuable lessons during this particular prompt. 
1. Don't get cocky! I've only attempted to watermarble twice, and they were both fairly successful, so I thought this one would be no problem. 
2. Quit while you're ahead. That gradient was simple, but I loved it. I did consider just leaving it, but as I did a plain gradient for the Color Opposites prompt, I felt I needed to jazz it up.
3. Don't watermarble with black polish. Just don't! I taped off my nails, I oiled up my cuticles with balm, and I still spent 45 minutes cleaning up. And my cuticles still look a mess. So I think I'll just avoid black from now one! (And red too, most likely.)

Check out the rest of the lovely challengers in the links below- hopefully they were more successful than I was today!


Sunday, January 20, 2013

NEW 31DC: Texture


I have to be honest, right out of the gate. I HATE anything even remotely texture-y on my nails. I will never do a caviar or velvet mani. I'm not remotely interested in the spun sugar technique. I will definitely not be buying the OPI Liquid Sand polishes. That said, I really had to wrack my brain to come up with something for today that would fit the challenge and still be "me".


Matte is definitely a texture- score! I don't care for the feeling of wearing matte polish, but it looks cool, so I do on occasion. Here, I started with a base of Sinful Colors Black on Black and topcoated with Seche Vite for high shine. Once that was dry, I freehanded a French tip with NYC Matte Me Crazy topcoat. Then I used a dotting tool to make matte dots on the shiny part of my nail, and Seche Vite to make dots on the matte French tip..


I do actually really like this look- I think it's sleek and sophisticated and edgy, all at the same time! I wish I had left off the dots on the tip, though. Too much.

Do you hate texture as much as I do? Or are you a texture junkie? Make sure to check out the rest of the challengers in the comments below!