Wednesday, August 29, 2012

Madness, I Say!: Moonlight Madness by Styler Design

No story or anecdote today- let's jump right into polish!


Today's beauty is Moonlight Madness, by Styler Design. First off: This polish did experience some settling. Not so badly as Party Mix, and Sarah from Styler did tell me after that post that she is revamping her formulas to get rid of the settling problem.


Here were are properly shaken up (just a few seconds worth), and look at the pretty! It's like an 80's party in a bottle. Sarah calls Moonlight Madness "a black base with a green and purple iridescent look. It has just the right amount of medium sized silver square glitter, medium sized teal hex glitter, medium sized square purple glitter, and flakes of silver, teal and purple glitter." All in a black jelly base.Maybe 80's party was the wrong descriptor: the teal, purple and green combo makes me think of a mallard duck!


Here we see three coat Moonlight Madness on its own, topped with a thick coat of Seche Vite. The black base wasn't so thick that the glitter got completely hidden (though it does get obscured with more layers), but it didn't need a black base coat either, which is pretty awesome. There are already at least three bottles involved in any mani (four, if I use Gelous, which I do for most glitters), so not needing undies is always a plus! For glitter purists out there: a black base plus one coat will net you the same look :)


Styler Designs polishes can be purchased on Etsy- Full size bottles for $8.75, or a pack on 3 minis for $14.25. There is also a Facebook page to like, offering updates and swatches of all her lovely colors!

Support your indies, ladies!
Cheers,
-Liz-

P.S.- On a completely unrelated note, you may have noticed that I've begun watermarking my photos. After the Sinful Fiasco last month, and now Miss British Steal All The Posts, I thought it prudent. They are not professional, and they won't stop anyone who really wants me pictures, but there you have it. Sad that it has to be done, but at least I'll be sure to get credit if anyone wants my pictures!


*This product was provided to me for an honest review.

Tuesday, August 28, 2012

PVA Base Coat + Trelly Polish: Clown Car Exhaust

I'm starting off a little different today: I tried PVA glue as a basecoat with my mani today. I didn't take pictures, partially because I was feeling lazy last night, and partially because there are a few blogs out there that have already done a great job at the step by step. (The two that I've read, and can think of off the top of my head, are Nails by Ms. Lizard and Pretty Purple Polish.) I applied a base coat as normal (not a good idea- the base peels up with the glue, but not very well. More on this in a bit.) I then applied Elmer's Glue All- which is pretty much the same as Elmer's School Glue. Usually sold right next to, and a 4 oz bottle cost me under a buck. Divided by a half-ounce polish bottle equals out to about 13 cents per bottle!

I poured the glue into an empty polish bottle, and applied it just like any other polish. Let dry for about 5 minutes (it applies white, but dries clear, so no guess work!). Topped with my color and glitter. (Sinful Colors Let's Meet and Trelly's MISC Polish Sunset Boat Ride- which is just as glittery as every other Trelly I've tried- but those photos are for another day!). Topped with a coat of Gelous and a coat of Seche Vite.

I was slightly worried about getting the glue wet, as I wash my hands a lot at work, but it really wasn't a problem at all. See Pretty Purple Polish's post about it- she did a 5 day wear test, including doing the dishes gloveless. The hardest part for me was waiting all day to see if it worked! I'm a horrible picker, so I was incredibly excited about the prospect of peeling a whole nail's worth of polish off in one go! Alas, it did not work out so well :( Apparently, this is meant to be used IN PLACE of a base coat, not in conjunction with. The base coat (Palladio Fuse, btw) came up with the polish for the most part, but did stick to my nail in many places, leaving me with a sticky, gummy mess on my nails. But no glitter! I'm telling you, I'm absolutely doing this again tonight when I paint my nails! Without the base coat of course :) It may be too early to tell, but I'm pretty sure I'm a convert.

So, enough of that rant- on to the Trelly Polish I'm actually showing you today!


Clown Car Exhaust! Cassie from Trelly Polish calls CCE "a glitter top coat in a clear base, with a multitude of glitters even including black "tires"!" And so it is. This is absolutely a circus-y polish, with matte and metallic hexes in multiple sizes, squares and bars- in every color of the rainbow!


This is such a happy, summery polish. As much as I'm looking forward to fall, and fall colors, I knew I couldn't let this one slide by! I needed to wear it and get the full effect before the end of summer. 


Photo shows one (!) coat of Clown Car Exhaust over Wet N Wild Dreamy Poppy, topped with a coat of Gelous and a coat of Seche Vite. All photos taken in full, direct sunlight.


This glitter looked amazing over every single color I tried it over. I thought about layering it over a Skittle mani, but I hate to take away from the glitter by making my base colors too show-stopping :)


You can see the glitter mix a bit better in the closeup- I couldn't even begin to describe all the glitters in here! I absolutely adore a good random glitter mix- I was lusting after a pair of shoes at Deb last fall- this style, but  with more of a platform, and more varied in color. Alas, they clearance before I bought them, and they only had a size 6 left! Damn my waiting! Anyway, the point is, I affectionately took to calling them the "glitter vomit" shoes. And ever since, random multi-colored, absolutely fabulous glittery things are known to me as "glitter vomit". In the best of all possible ways, of course! This polish is definitely glitter vomit!

It applied easily as well. Cassie recommends dabbing the glitter on for the best coverage, but I didn't have to. I painted this on with regular strokes, like any other polish. There was a bit of dragging, but I light touch eliminated any problems with that. Also- that is only one coat on my nails! This is very saturated with glitter! I have loved every Trelly Polish I've tried, and will definitely go back for more.

Trelly's MISC Polish can be purchased on Etsy. Full sized bottles are $9, minis go for $4.50. Be sure to stop by the Trelly Polish Facebook page and pay a like as well- there are previews of her Haloween polish, Spiked Witch's Brew, plus her newest Collection, which is movie themed- love I'm a Mouse, Duh!

Support your indies, ladies!
Cheers,
-Liz-


* This polish was provided to me for an honest review.

Monday, August 27, 2012

Master Shake!! by Daring Digits

One of the first polish blogs that I came across and started following was Polished Cousins. Erin, one of aforementioned cousins, posted a while back that she hated the term "lemming" as applied to polish. It seems to imply that you want it only because everyone else does, at least to me. Her proposed replacement? Stalkee. I absolutely agree that a new term is needed, but I don't really stalk polish either. So my term: crush. I totally have a crush on this polish. Have since the first time I saw it, and I knew it would eventually be mine. 


Ladies: Meet Master Shake by Daring Digits. I love to look through Etsy's sold listings as well as available polish, to better get a feel for the polishes the shop is able to make. I made it as far as Master Shake before I stopped dead, and sent a convo asking Ashley to make it for me. Alas, the base was out of stock :( Hence it wasn't listed. But never fear!, she assured me, as it was on the way, and would be restocked soon! So I waited. And waited. And saw the frosty version of this polish, which- obviously- would not cut it. Then finally, after long years of agony (or perhaps a few weeks), I chanced to catch a glimpse of that oh-so-coveted creamy base on my Etsy sidebar! ::SNAP:: Into my cart it goes, along with select other Daring Digits to be shown at a later date. Enough of the saga- read on to see why I was so in love with Master Shake!


Ashley, an avid ATHF fan, calls this polish her "tribute to Master Shake. White base polish with pink and yellowish gold glitter." It is also available in a frosty white base by special request. But cremes are my thing, girls. I NEEDED the creamy base! 


Instead of your typical "holding the polish bottle" photo op, I wanted to show this photo- the never-before-seen "holding a bottle of milk" photo op :) For science, of course! The base of this polish isn't truly white-white, but kind of a less yellow buttermilk color. A gorgeous, off-white speckled with pink and gold. 


Against another white background. This is three coats of Master Shake alone, topped with Seche Vite. Photos taken outdoors in direct and indirect sunlight. 


In the shade. This photo doesn't really offer anything that the others don't, but I like to show you a variety of lighting when available.


O.M.G. I never say that, but seriously- what else can be said? 

This polish went on like a dream- it was everything I wanted it to be! I personally wouldn't recommend layering this polish over white (as might be expected), simply because the gorgeous glitter depth would be lost. I did try it out on a nail wheel, but immediately rejected the idea. Master Shake's creamy base built to opacity in three coats, and the floating glitter look is amazing. I seriously love glitter creme-jellies. (Often called crellies, but I dislike that term as well.)

Daring Digits polish can be purchased on Etsy- slightly more than full size bottles (16.5ml as opposed to 15ml) are $7.75, and minis are $4.25. Ashley offers the gamut of polishes from glitter toppers to glitter in colored bases to interference polishes, and even a few shimmers. All polishes are 3-free, made with suspension base and stainless steel mixing balls. Be sure to check out Daring Digits on Facebook, instagram (#daringdigits ) and their very own blog as well.

Support your indies, ladies!
Cheers,
-Liz-


Sunday, August 26, 2012

Ignite the Imagination!: Black Widow Balms

As much as I love nail polish, I love makeup, too. So every now and then I veer off into the less familiar territory of makeup reviewing. Today is one of those days. Now, I'm not a lipstick girl. I probably only own three real lipsticks. While I love the idea, and there are some out there I would die to own, I haven't found many good ones. They tend to be either too drying, or they don't last. Enter tinted lip balm! Lip balm, I probably have about 100 of! 


Enter Black Widow Balm. First of all: LOVE the packaging! Typical lip balm tube size and shape, but in black with an adorable sugar-skull looking guy on it. Black Widow Balm's website states: "We have a healthy obsession with healthy lips. We've created a moisturizing line of tinted lip balm butter to smooth your pout. All our lip balms contain rich shea butter, mango butter and coconut oil with mood soothing essential oils to gently lift your spirits."
 On to the pretty!


Okay, so this one is not so pretty. This is my bare lip, after abstaining from any balm use for at least an hour. You know, for comparison purposes. I have a very sensitive nose, but I can be very bad at identifying smells, so I'll give my guesses as to smell, then the shop description. 


Our first balm is Gossip, a sheer bright red balm with a very cinnamon-y smell. 


Black Widow calls it "The scandal maker." A sheer, cherry pop of color. "Smells like just baked cinnamon rolls with a sprig of mint." This is easily one of my favorites- the color builds, so with a few applications, you get a nice red lip look. I'm not sure how to quantify it, but I applied all balms just as I would a regular, non tinted balm. 


Next up is Holly, a sheer, juicy orange with a very fruity- but not cirtusy, smell.


"Never Go Lightly" This is my first experience with orange lips, and I kind of like it. Especially since it's sheer, and not too in-your-face. Don't get me wrong, I love bright colors, but since I don't wear lip color often, this is a great way to experiment a bit.  "Tantalizing tangerine tint. Raspberry fragrance."


Kiss of Death is an orange-y, brick red tint with a spicy scent.


"XXXOOO" This one is darker and less subtle than Holly. Still sheer, still appropriate for a day look, but would definitely punch up and evening look as well. "Kiss of Death is a knock-out red. Essential extracts on cinnamon, clove and basil oils softens your lip and is scented to spicy perfection."


Orb is a sheer, coral pink with a fruity, berry fragrance.


"Celestial shine. Orb lip balm colors your lips to a shimmering light pink. . . . lavendar, spicy black pepper and sweet raspberry." I put this color to the "work test" and it passed with flying colors. This is easily my favorite of the bunch, as it's very soft and neutral. 


Ursula looks a bit scary in the tube, but applies as a sheer, dark purple. Scented, but I couldn't identify it.


Dramatic, but not overbearing. "Ursula is the first in our tinted lip balm line. It tints to a bold black-violet color while soothing lips with clove, lavender and vanilla." 


Voodoo also looks frighteningly dark in the tube, but goes on a sheer brownish. Another scent I couldn't quite place.


I have incredibly pale skin, but this would be a lovely "neutral" shade if you are have a darker complexion. "Voodoo lip balm colors your lips to a ripe plum tint. Essential extracts of cinnamon, black pepper and lavendar oils" I would call this color more of a cocoa than a plum, but there are definite purple undertones.


Last up is Spell. This one was more opaque than the rest- a creamy, dusty violet color with a fruit scent.


"Spell's charm is found in its lilac bloom color. . . . vanilla, black pepper and lavender oil starts with a sweet scent and finishes clean." Guess I was wrong about fruity? Spell is definitely the boldest of the bunch.

As I stated up-post, Black Widow Balms definitely passed the "work-test". I kept Orb in my pocket at work all day, and used it exclusively. They go on smoothly- light and oily (in a good way), not at all sticky. It feels like it sits on top of the lip, but is very moisturizing. Slightly sweet, but not flavored. Great color payoff and very shiny. I noticed- with Orb at least, and to some extent Gossip- that the color builds. When the shine/moisture wears off and it's time to reapply, the color is still there. Not really a stain, because you can get the color off, but it does become more intense with repeated application. Black Widow recommends layering these over your favorite lip color, but it certainly isn't necessary.

Bottom line: these balms are amazing. Feels just like a standard lip balm, with a pop of color and great scent. Orb has become my go-to lip color, and I reach for it far more often than I ever have with my lipsticks. Holly and Gossip are definitely close seconds. Black Widow Balms run $8 a piece, and can be purchased on Etsy or directly from their website. Be sure to stop by and like them on Facebook as well!

Support your indies, ladies!
Cheers,
-Liz-


* These products were provided to me for an honest review.

Saturday, August 25, 2012

Follow You Until You Love Me: Paparazzi by Custom Nail Art

I'm such a bad blogger! I've missed so many posts this week, and I'm incredibly sorry- it's been a hellish week at work, and the last thing I wanted to do when coming home was more work. But I'm here now, and scheduling a bunch of posts for next week, so I get my relax-after-work time, and you still get to see the pretties I have collected :)


Today's pretty is Paparazzi by Custom Nail Art- a clear based glitter topper just packed with gold holo bar glitter, plus a dash of small violet hexes. What a regal combination, and something that I haven't seen before. 


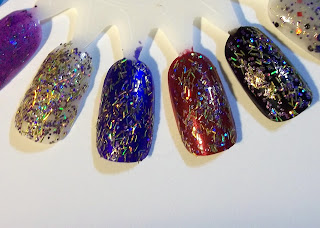
This polish really shines over darker colors, in my opinion. L-R on nail wheel: 3 coats of Paparazzi alone, and one coat over Wet N Wild Buffy the Violet Slayer, Wet N Wild Burgundy Frost and creme black.


I chose to use the burgundy with a black accent nail for my full mani. Photos are taken indoors under "natural" light bulb. Not much sun around here for a few days :(


This is one coat of Paparazzi over my base color, topped with a coat of Gelous and a coat of Seche Vite.


I absolutely love holo glitter, but I'm usually not really a fan of bar glitters. My nail beds are very curved, so they tend to stick off, and if there's any curling- I'm a picker, so they don't last a minute! Luckily, I had zero problems with these bars. No curling whatsoever, and the Gelous+SV combo kept them firmly plastered to my nails. This is also a very generous glitter polish- one coat was PLENTY to give my nails all the pizzazz that I could want! Three coats wasn't completely opaque, but it was pretty close. I've never seen a full on, Rockstar glitter manicure with a predominantly bar glitter before. I may have to try that :)

Custom Nail Art is new to the scene- to me at least. She's got some beautiful polishes available- shaped and funky large glitter mixes to smaller full coverage glitters to NON-GLITTER polishes! (Check out Timberwolf - pretty grey duochrome shimmer.) I really love when indies offer cremes and shimmers, because sometimes- I just need a break from all that glitter! Blasphemous, I know, but it's such a PITA to remove, that at least once a fortnight, I want something pretty, but still low maintenance. 

Custom Nail Art Polishes can be purchased on Etsy- full size bottles run $7-$11, and minis are $3. She also has special "packages" where buying multiple bottles will net you a bit of a savings. Don't forget to Like on Facebook for updates, sales, discounts and news- like two new collections premiering in September!

Support your indies, ladies!
Cheers,
-Liz-


* This polish was provided to me for an honest review.

Wednesday, August 22, 2012

A Plea for Help!: Vinyl Junkie by All That Glitters

Let me start out by saying this: I love this polish. But I had a hell of a time with it. It's been sitting in my draft folder forever, in hopes that the perfect underwear would magically come my way. It sat so long I forgot that it never got posted- so sorry! I'm not sure I've ever had this problem before! So in addition to the review today, I have a request for your opinions: what the hell should I wear this over?


Meet Vinyl Junkie by All That Glitters. Kristen from All That Glitters calls this a "dark grey pearly base with black glitters in various colors, shapes and sizes. Despite just being a dark grey/black polish the pearly base really has a shine and sparkles!" This is absolutely correct- the base is gorgeous and shimmery, and there are tons of black bars and multiple sizes of black hexes. It seems to be Spotty Dotty Dark with a colored base. You can just see the touches of shimmer and chunks of black glitter in that bottle shot.


This is three coats of Vinyl Junkie on its own (except index finger, which is two coats), topped with a coat of Seche Vite. Photos were taken indoors under a "natural" light bulb, sans flash.


The base is beautiful, the black shows up nicely against the grey . . . but I really felt like this needed a coat of color underneath. Or something. The shimmery grey base isn't quite opaque enough that I really enjoyed it on its own. So I swatched on a nail wheel. And swatched, and swatched. Here are some of my trials:


L-R: two coats of Vinyl Junkie alone, and two coats over: creme black (rejected- black glitter got lost), Wet N Wild Metallica (I may have to revisit this one) and LA Colors BCC (seemed kinda blah).


So then I had the idea: NEONS! L-R: one coat of Vinyl Junkie over: Sinful Colors Fusion Neon, Sinful Colors Happy Ending, Sinful Colors Cloud 9, Sinful Colors Neon Melon and Sinful Colors Dream On. The Purple got too dark, and the green, orange and yellow just became an odd colors with the grey topper. I love the pink on the wheel, but I didn't even take pics of the mani, because one coat of Vinyl Junkie was too streaky on my nails (I'm way better at painting a wheel than my own nails!), but two coats became way too dark. Hrm. 

As far as application goes, this went on nicely. It is a bit thick, but nothing a careful hand (or drop of thinner) won't cure. The first coat (as mentioned above) is a bit sheer and streaky, but it evens out with two or three coats. It does not become completely opaque, however. There was no glitter fishing, and no clumping together.

I have seen swatches of this polish that were beautiful- and they all seem to be of Vinyl Junkie on its own. Kristen also says that this is All That Glitters' best selling and most favorited polish! (As of early this year.) It, along with Very Peacock-ish and other glitter-tastic polishes, can be purchased on Etsy. Full sized bottles are $8 Be sure to like All That Glitters on Facebook as well for restock information and some beautiful swatches of All That Glitters polishes.

I really, really love this polish in theory, I just haven't found the best possible way to wear it. I promise you, you will see this polish again once I conquer it and bend it to my will. And find appropriate undies. My next attempts will probably feature a dark red, another shot at the silver, and possibly a more subdued purple? As well as all of your ideas! 

So what do you think, ladies? What color is this polish destined for? 

As always, Support your indies!
Cheers, 
-Liz-


*This product was provided to me for an honest review.


Tuesday, August 21, 2012

Not Really Polish: What Happens in Vegas by Makeup Your Face

For today's second post (in apology for going two days with no post!), we have a little something different. I have done makeup reviews before, but I'm still far better taking photos of my nails, so bear with me!


Today's lovely, which I do absolutely love, it the What Happens in Vegas eyeshadow stack from Makeup Your Face. Contains loose, slightly shimmery shadows in 6 shades: Top to bottom: Honeymoon Suite (hot pink), Weekend Getaway (orange), Jackpot (yellow), Drive Thru Blue (duh), Royal Flush (purple) and Lost Wages (black).


Arm swatches: brushed on over Hard Candy Eye Shadow Primer. Full Sun.

I played around with this one for quite a while before this post, and I have three looks to show you today.


Look #1: Rainbow eyes! I used Honeymoon Suite in the corner of my upper lid, Weekend Getaway in the middle of my lid, Jackpot on the outer lid corner and on the brow bone, then Royal Flush and Drive Thru Blue on my lower lash line, all over Hard Candy primer. I mixed a bit of my primer with Lost Wages to use as liner. Topped with Maybelline Lash Stiletto mascara in black. Waterline liner is Cover Girl Perfect Point eyeliner in Black Onyx. I absolutely love rainbow eyes, and any palette with a good chunk of rainbow colors will eventually be used as a rainbow eye! I did find myself wishing for a good green in this stack a few times.
.

Look #2: Sunset eyes. Honeymoon Suite on the brow bone, Weekend Getaway on my upper lid, and Jackpot blended with a bit of Weekend Getaway on my lower lash line. Rimmel Scandal-Eyes Waterproof Gel Eyeliner in Black (which I found thanks to You Had Me at Makeup- bought it the day I read her review), and the same mascara, primer and waterline liner as before. 


Aand Look #3. Which would not photograph properly. I was in a rush to get out the door, and all my photos had this odd, fairy light look to them. Anyway: Drive Thru Blue on my lid, Royal Flush on my brow bone and lower lash line, Lost Wages mixed with primer to create liner. Primer, mascara waterline as before.

These shadows were all nice and bright. If you put them on dry with a light touch, you can achieve a nice wash of color (which is foreign to me!). Over primer, or even wet- WOW. I've never really used shadow wet, other than as an eyeliner, but if you want through the roof color intensity, these will absolutely get there. These shadows also lasted- through breakfast with my four and one year old niece and nephew in one case, through a day of shopping- and trying on clothes, no less!- in nearly 100 degree heat. No caking, no smudging. All were applied using Eco Tools Bamboo shadow brush. Very little fallout. Overall: I'm very impressed with these, and can't wait to show you all my other goodies from Lauren at Makeup Your Face! I've got more shadows, including a creme shadow trio, plus lip gloss and body shimmer. She is also offering NAIL POLISH now, which I totally would have snapped up if they were available when I got these!

Makeup Your Face products can all be purchased on Etsy. This stack runs $17. MUYF offers many shadow shades in stacks, single color pots and sample size baggies, plus lip glosses, body shimmers, nail polish and nail polish jewelry. Stop by Facebook and pay them a like, then check out Lauren's blog- she's reviewed one of my polishes as well :)

Support your indies, ladies!
Cheers,
-Liz-


Mardi Gris: Winter is Coming by Geek Glitter

I did it! I came up with a clever name! Mardi Gris, or Grey Tuesday, will hereafter be my version of Blue Monday. Because I enjoy neither blue polish nor Mondays, but I LOVE me some grey polish! I merely tolerate Tuesdays. I can't promise that you'll get a grey every single week, but let's face it: It's pretty damn likely.


Without further ado: Winter is Coming by Geek Glitter! If you know absolutely nothing else about Game of Thrones, you know that Winter is Coming. The words of House Stark do not boast of honor or loyalty or ferocity, but warn of the impending winter. 


Rebecca from Geek Glitter says that Winter is Coming is "part of the Game of Thrones collection, inspired by House Stark's sigil- a gray direwolf racing across a field of white. . . Winter is Coming contains sating white glitter, fine silver glitter and silver holographic glitter in a shimmery gray base. The base in this one is super pretty- it's gray, but it flashes an icy blue in the sunlight." I couldn't agree with this more- the base is super gorgeous! And so is the glitter, of course :) Unfortunately, nature decided on an overcast day when this was worn, so I couldn't capture photos of that blue flash- I did get to see it a bit though!


Photos show three coats of Winter is Coming, topped with Seche Vite, in outdoor, mostly overcast lighting.


Ohh, hey! There's a little sun!


Hey, I lied! You can see a bit of that ice blue flash near the top of my finger there. Also a great shot of that tiny holo sparkle. Winter is Coming went on very easily with no glitter clumping. I probably could have even gotten away with Out the Door as a topcoat, but I use Seche Vite on all my glitters out of habit. The silvery-grey base went on over those white satin hexes (the larger glitters) just enough to make it them look snow covered. If snow were silver. Which I kind of wish it were. Back on topic- it cut the "stark"ness (see what I did there?) of the white, without actually burying it. 

Geek Glitter polishes can be purchased on Etsy. Full sized bottles run $8.75, while minis are $4. All polishes are made with suspension base, solvent resistant glitters and stainless steel mixing beads. International shipping is also available! Good news, my overseas sistas! Stop by Geek Glitter's Facebook and pay her a like, and check out my review of her Khaleesi polish!

Support your indies, ladies!
Cheers, 
-Liz-


*This polish was provided to me for an honest review.